All users of the WordPress platform have been confronted at least once with the need to change the main domain of the installation when manually moving or cloning the website. This solution is necessary if you want to keep the content used so far. However, this change carries risks if it is not done correctly, which can affect your search engine optimization (SEO) results. Furthermore, if the old domain is not redirected to the new one, you may lose users who have bookmarked the website with the old domain name. In this article, we will look at some mandatory steps on how you can change the domain without affecting your website's rankings in search.
Why Would You Want to Change Your Domain Name?
The reasons for changing a domain name can be manifold. We will focus on the most common ones:
- Rebranding: this is a very common reason, especially for online stores, and involves changing the name of the store without changing the content.
- Business name change: this is also one of the main reasons why you should update your WordPress site’s domain name, especially if you have used the company name you have registered.
- New domain extension: often online stores opt for local domains (of the countries where they mainly sell their items) to increase the target audience of users. For example, if you change your site's URL within WordPress from .net to .com or .eu, the root domain in the WP installation must also be changed.
- Other reasons: examples include simplifying URL structure, improving SEO, merging two websites, targeting new audiences, and addressing negative reputation issues.
If you want to learn how to make an ecommerce website with WordPress, take a look at our detailed guide.
Preparations Before Changing the Domain Name
Before we change the primary domain, we need to prepare the website for this process.
1. Backup Your WordPress Site
Changing the primary domain in a WordPress installation requires changes to the files and the database. We therefore recommend that you create a backup of your site in case you encounter problems when changing the files and database. In this step, we will show you how to create an installation archive quickly and easily using the cPanel tools.
- WordPress Manager by Softaculous
It is also the best-known manager for managing WordPress installations in cPanel. You can find it in the Software section of cPanel:

Once you have opened the installation of your choice, you can quickly and easily create an archive:
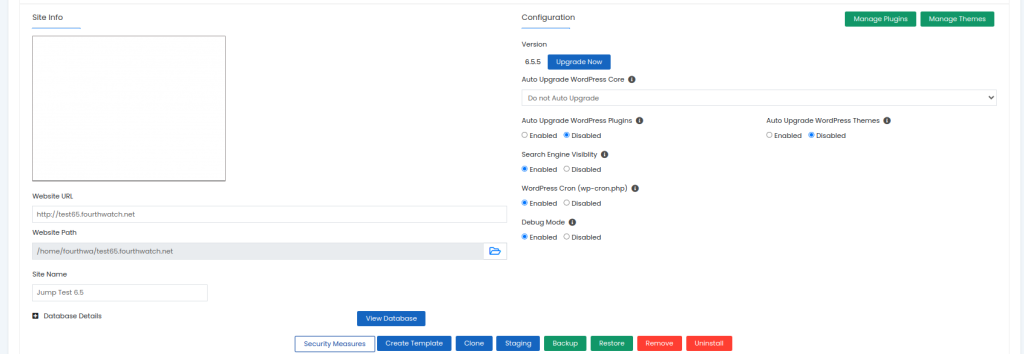
Press the “Backup” button and follow the steps.
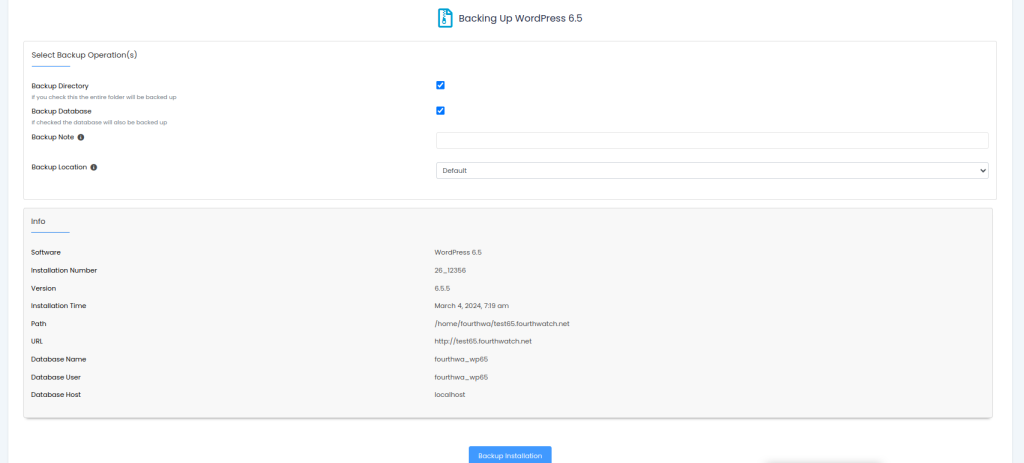
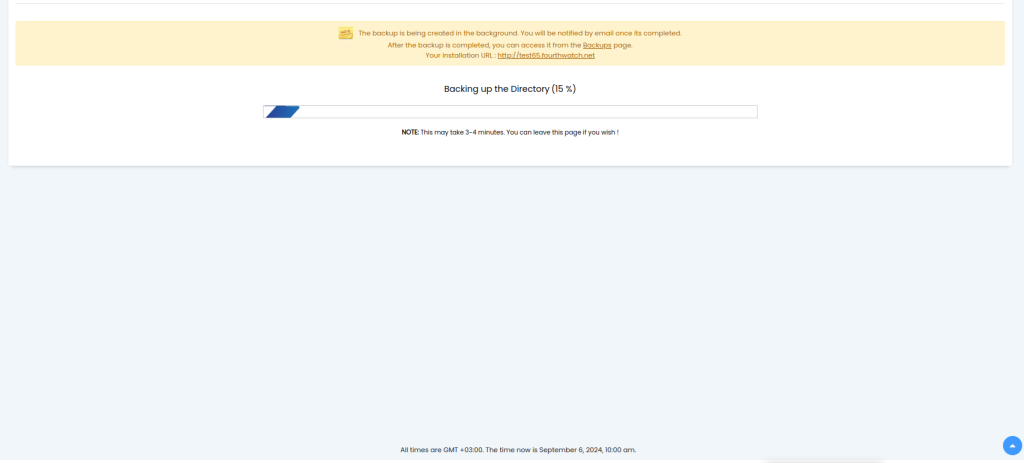
Wait for the backup process to complete:
- WP Toolkit
Recently, cPanel has integrated a fully functional tool for working with WordPress at the hosting level. Many of the useful tools included are similar to working with Softaculous' WordPress Manager, but are enhanced and provide additional convenience for users. WP Toolkit also allows you to quickly and easily create an archive of your application.

Open the tool and select the desired installation:
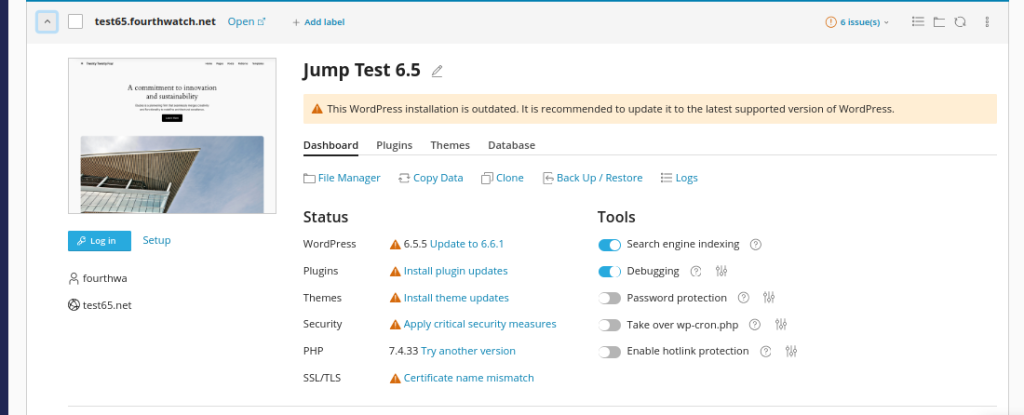
Select the Backup / Restore field.

Press the “Backup” button and wait until the process is complete.

Once the archive has been generated, it is displayed in the box, and you have the option of restoring it and downloading it to a local drive.

2. Access Your Hosting Account and New Domain
In the following, we will go through some of the steps that need to be taken before changing your primary domain name. After you have signed up for hosting, you need to check whether the domain you want to change is the primary domain of the hosting account or not. This data can be found in the cPanel info box:

The change of the primary domain for the hosting account is carried out by technical support at the customer's request. After this change, no further preparatory measures need to be taken, as the new primary domain automatically takes over the working directory and the mail accounts of the old one.
Now let's look at the case where our WordPress site is an additional domain to our hosting plan. Here are the steps to follow:
Step 1: We check the working directory of our domain. This is done via the Domains field in cPanel.

In the example, we see that the working directory of the domain test65.net has the same name in the hosting structure. The new domain we have chosen and purchased is test66.net. The fastest method is to change the name of the working directory from test65.net to test66.net.
Step 2: Rename the domain's working directory. We can make the change quickly and easily through cPanel's FileManager, by right-clicking on the folder itself and selecting the Rename option.

Step 3: Add the new domain as an additional.
After you have changed the name of the directory, you must add the new domain as an addition to the hosting plan. This is done via the Domains field and the "Create a new domain" button.

After you have filled in the fields for the new domain, the name that we have already changed (in the example test66.net) is automatically selected as the working directory.

Step 4: Delete the old domain from the hosting.
After you have added the new domain and changed the name of the working directory, you can delete the old domain so that it does not appear as added.
3. Let Users Know
It is very important that website users are notified when the domain name changes. Very often, each of us bookmarks a particular site URL directly in the browser, and such a change can cause inconvenience for users, especially if it is an online business. Therefore, it is important to prepare for the change with a notification on the website or by email to users about the possible rebranding.
It is desirable to provide a summary of why you are moving your site to a new domain and that it is related to the convenience of customers. Choose a place on the website where it is visible to all and will not be overlooked as information. If you have registered users, use their emails to inform them of the process.
How to Change the Domain Name of Your WordPress Website
It is very important to note the basic steps to follow when changing the domain of a website. A WordPress application consists of a file structure and a database, and all the important settings of the application are stored in the database in the form of tables. This includes the comments and posts that users leave (as well as the data about the online products in the store).
One important piece of information that is stored in the database is the exact location of the specific files for a particular product or post. This includes the path to the photos and other media as well as the text in the fields themselves. The database works with relative paths (permalinks) or with the full path (hardcode).
What is the difference between them?
Relative paths indicate where a file is located using the domain name. When you add the domain to the hosting, it is known that this domain runs from a specific directory on the hosting. In the WordPress database, such a path is recorded in the following form:
https://test65.net/wp-content/uploads/01.jpg
In this case, the full path of the 01.jpg file is specified as relative, and the browser expects the hosting to return the location where it is physically located in the application structure. This is described in cPanel, and the working directory of the domain can be viewed in the Domains section. The physical hosting path for the specified file should look like this:
/homе/cPanelUser/DomainDirectory/wp-content/uploads/01.jpg
This information is important because some WordPress plugins use the full hosting path and record this information in the database. If you change the domain of the WordPress site, you must therefore change all links associated with the old website, regardless of whether they are described with a relative or full path in the database.
We will look at different methods for changing the primary domain in WordPress and the steps to follow:
- Change the WordPress application settings.
- Set up a 301 redirect from the old to the new domain.
- Change the internal links in the application.
- Change the domain in Google Search Console.
- Check the website and the links it contains after the change.
Step 1: Update WordPress Settings
1.1. To change the main domain via the application settings, you must call up the WordPress admin panel of the website:


1.2. From the Settings menu, select General:

1.3. Add the new name of your domain to the WordPress Address and Site Address fields:

1.4. Save the changes made using the 'Save Changes' button, which is located at the end of the settings field:

Step 2: Implement a 301 Redirect
Users often save the websites they open in the browser. If you change the domain for a website, it is most convenient for them to redirect the old domain name to the new one. It is also important to mention that if the old name previously had a high SEO value, this change can bring it down in search engine indexing. Therefore, a 301 redirect must be made from the old domain to the new one.
What is a 301 redirect?
This is the so-called permanent redirection from one domain to another, i.e., every time you enter the old WordPress URL in the browser, it does not load its own content, but the content of the new site each time. With this redirection, the name of the new domain is displayed in the browser bar.
2.1. Redirect via .htaccess
To redirect the domain via the .htaccess file, you can quickly and easily use the cPanel redirect option. Select the Redirect field in the Domains section:

After you have opened the tool, you will see the following screen:
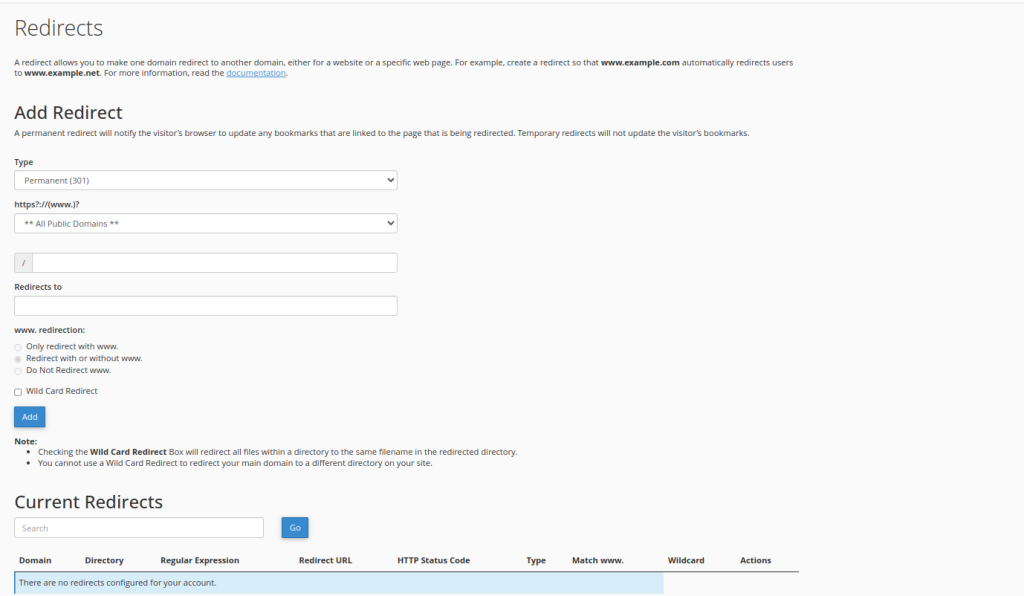
- In the Type field, select the redirect 301 option.
- Select the domain name you want to redirect from the drop-down menu in the https?://(www.)? field.
- Leave the field with a '/' empty, as this means that all content should be redirected to the new domain.
- In the Redirects to field, write the new domain with the protocol to be redirected, for example https://test65.net/.

Also, select whether the domain should be redirected with or without www, and click on the 'Add' button.
If everything is set correctly, you will see the following sample information:

The following redirect instructions are inserted at the beginning of the .htaccess file:
RewriteCond %{HTTP_HOST} ^test65.net$ [OR]
RewriteCond %{HTTP_HOST} ^www.test65.net$
RewriteRule ^/?$ "https\:\/\/test66.net\/" [R=301,L]
You can also insert the directives directly into the .htaccess file manually.
Do you know what else you can do in the .htaccess file? Increase the upload limit in WordPress—check how to do it.
2.2. Redirect via the Rank Math plugin
The other way to redirect the old domain to the new one is to use a plugin for this purpose via WordPress like Rank Math. Let's take a look at a few steps:
- Install the Rank Math plugin to your installation.

- Access your WordPress Dashboard menu, Select the Redirections module, and activate it using the slider.

- As soon as the module is active, it is available in the plugin menu.

- Select Redirects and click on the Add New button.
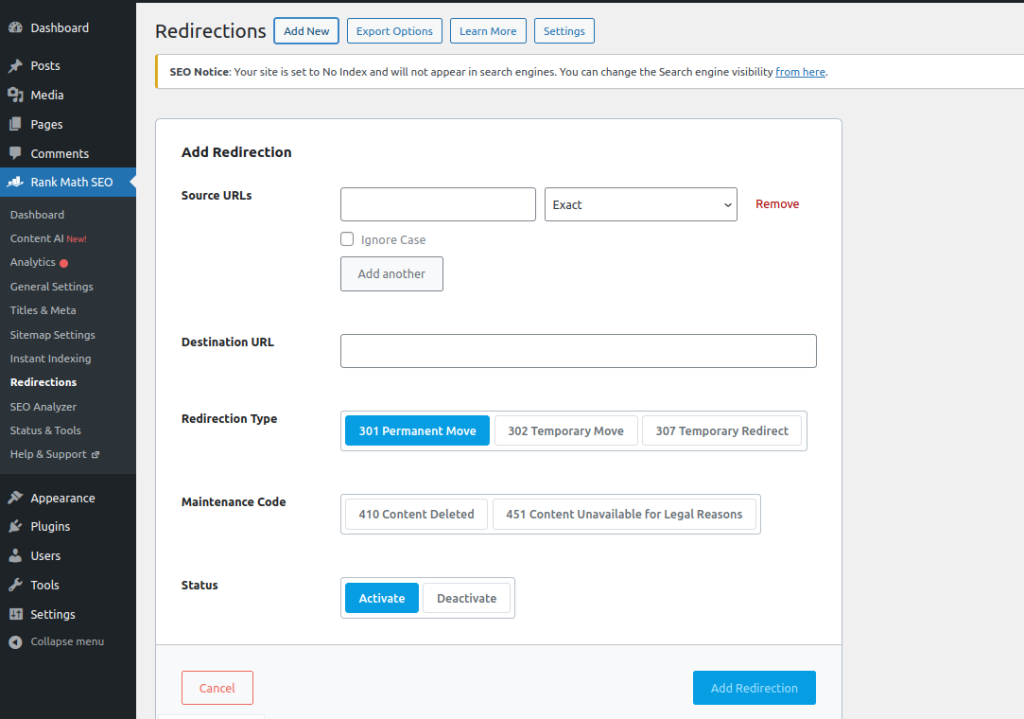
- Enter the details for both domains, select 301 redirects, and click the Add Redirections button.
Check out more options for adding a redirect with the Rank Math plugin on the Rank Math official page.
Step 3: Update Internal Links
This is one of the most important steps when you change the WordPress domain name because, as we have already explained, the internal (permalinks) of the application must be changed in order to be physically found in the hosting structure. We will show you how to change your domain quickly and easily.
3.1. Change the Domain Using the Command Line Interpreter (WP-CLI)
The WordPress shell offers a ready-made function with which you can easily and quickly replace the old domain with the new one in the website's database.
Note: This is only possible if you have purchased a plan that allows you to connect to the server via SSH.
After you have logged on
to the server and accessed the working directory of the domain, you must enter the following command in the command line:
# wp search-replace 'old_domain.tld' 'new_domain.tld' --all-tables --allow-root --dry-run
Here's what the command looks like with the example domains:
# wp search-replace 'test65.net' 'test66.net' --all-tables --allow-root --dry-run
Let's take a look at the additional parameters of the search-replace command:
- all-tables: this parameter specifies that you will make the change in all tables of the database;
- allow-root: the command allows root access to the base in order to make the change
- dry-run: displays the tables in which the changes must be made without this happening.
The source code of the command looks something like this:

The last line shows how many changes have been found and need to be transferred. When you have made sure that everything is correct, execute the command and remove the dry-run option, as in the example:
# wp search-replace 'test65.net' 'test66.net' --all-tables --allow-root
After the execution, the change is made, and all links in the database are changed with the new domain:

3.2. Change With the Plugin Better Search and Replace
Install the plugin Better Search and Replace

-After activation, the plugin is visible in the Tools menu:

-Start the plugin
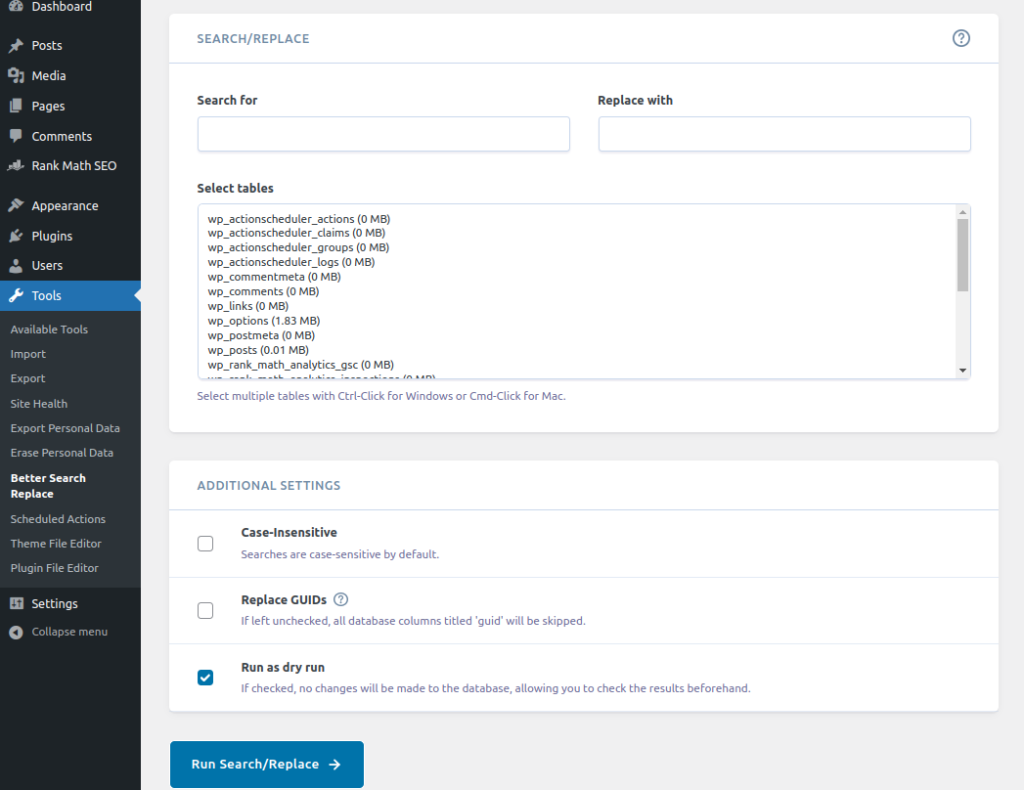
Enter the old domain in the Search for field and the new one in the Replace with field. Select all tables in the next field. As we can see, the Dry run option is also activated here. Recommended: start with this first.
After you have filled in the fields, they should look like this:
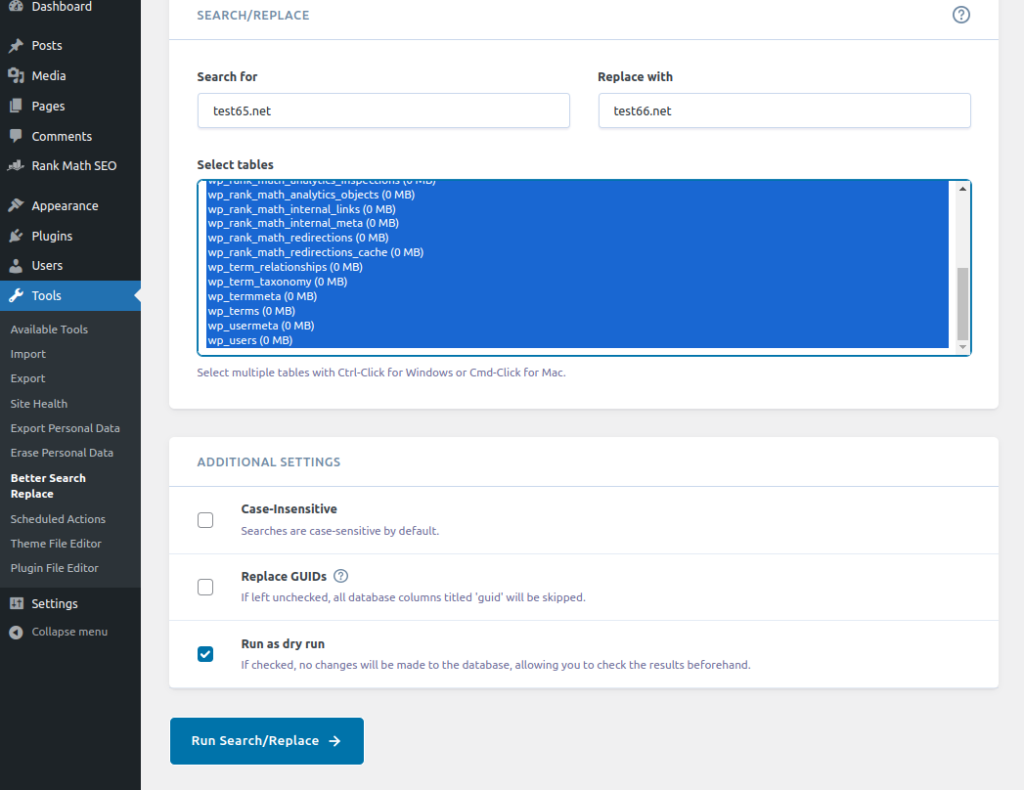
- Click on the 'Run Search/Replace' button and wait until the process is complete.

After execution, you will be shown how many matches were found and how many changes still need to be made:

Deactivate the dry-run checkbox and restart the process using the 'Run Search/Replace' button. The changes are made directly in the database.
Step 4: Inform Google About the Change
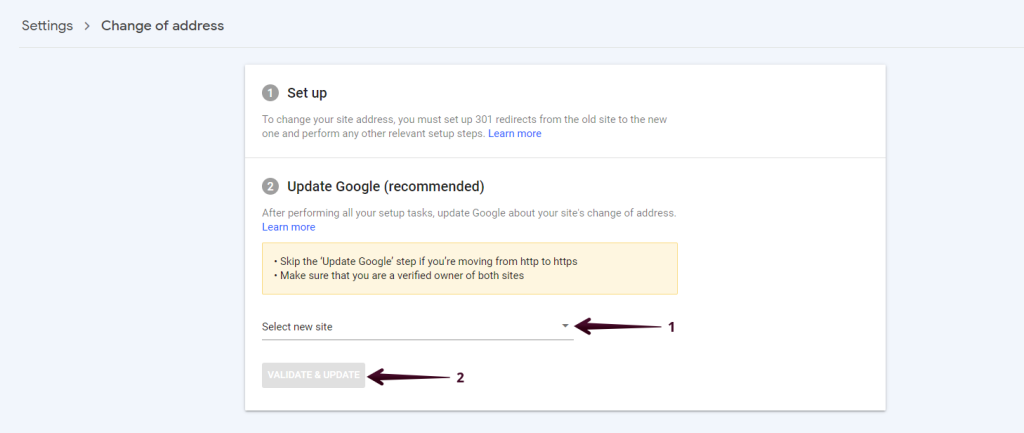
It is very important that after you have changed the domain for your WordPress site, you also change the domain in Google Search Console if the domain is registered there in order not to lose the previous indexing and SEO ranking. You must first perform a 301 redirect from the old domain to the new domain and add and verify the new domain in Google Search Console.
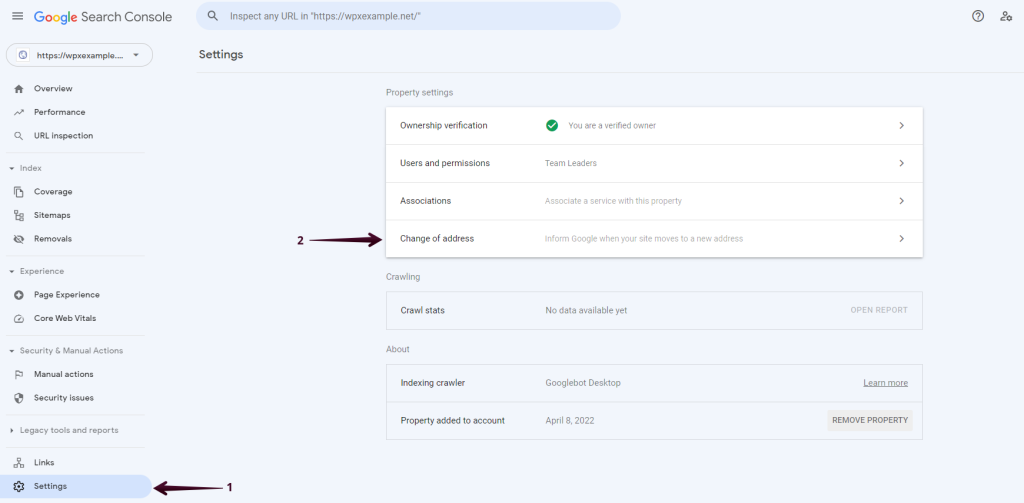
- Log in to Google Search Console via your Google account.
- Select Settings and from there the Change of address field.
- Select the new domain from the drop-down menu and click on the Validate & Update button.
Step 5: Testing and Monitoring
To ensure your domain is successfully changed, you should check your website’s functionality and verify that the links are redirected correctly. This is the last and one of the most important steps because any error on the website (404 or any other type, such as redirecting an existing domain) can lower the SEO score and the site can be considered potentially dangerous.
Nowadays, all browsers offer a handy toolset that debugs the application and displays complete information about connections and requests. Let us take a look at Google Chrome Development Tools. If you open the browser menu in the More Tools category, you will find the Developer Tools field:
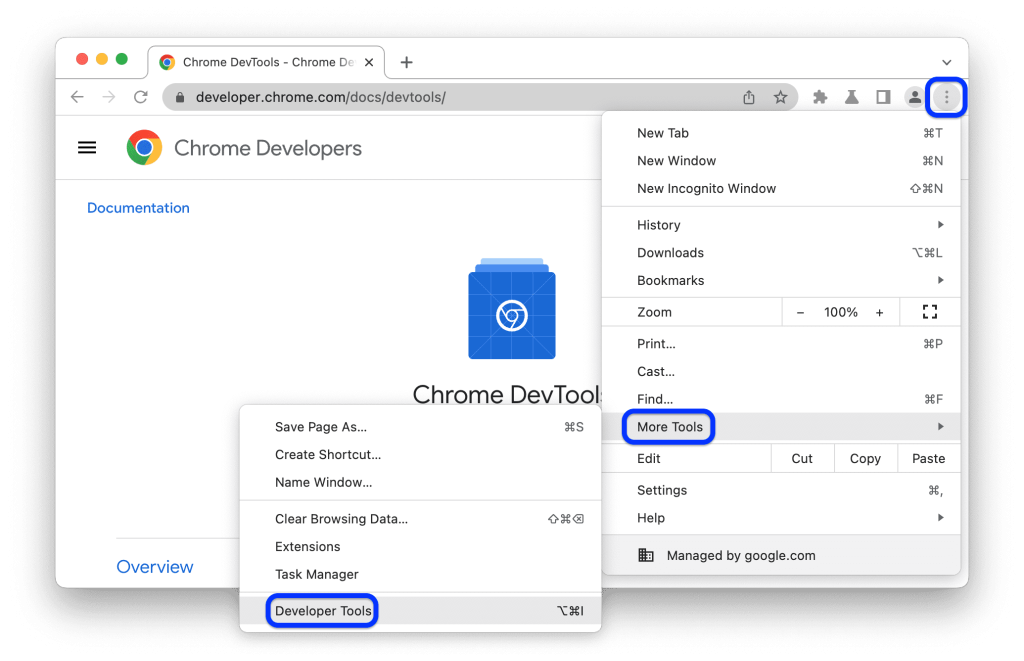
There is also a hotkey that requires the tool as follows:
| OS | Elements | Console | Your last panel |
| Windows or Linux | Ctrl + Shift + C | Ctrl + Shift + J | F12Ctrl + Shift + I |
| Mac | Cmd + Option + C | Cmd + Option + J | Fn + F12Cmd + Option + I |
When you start the tool, all the options it offers are loaded. Switch to the Network tab and enter the domain name in the browser bar.
The panel will load all the links and elements of the website with detailed information about them:
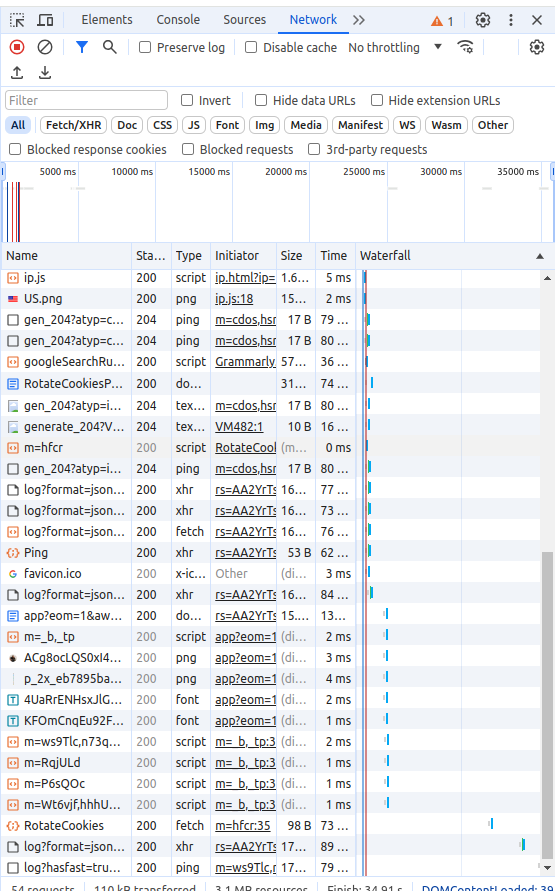
In the status column, you can see that all requests and links have the code 200, which means that the domain is forwarded correctly and all its elements are available on the hosting. If the code differs from 200 (e.g., 404), the corresponding element is colored red, and the number of errors for the website is displayed in the first line of the menu with the exclamation mark.
Once you have found the problematic elements of the website, you must analyze each link and check whether the link provided corresponds to the physical address of the corresponding hosting element. If you click on the request itself, the tool will give you complete information, which is very useful when analyzing the error:

Of course, you can always contact our technical support, which is online 24/7 and will help you rectify any errors.

Looking for the Perfect Domain? Get It From Hosting Jump
Choosing a new domain for your store or project is very important. That's why, as an expert hosting provider, we have made sure that you have a wide range of domain names to purchase through Hosting Jump. Our offers are always attractively priced and tailored to the promotions that domain registrants are offering. Once you buy a new domain, you will have access to a whole range of domain management tools via our customer profile, which are very convenient for users.
Most of our plans also offer a free domain for one year in the most attractive and sought-after domains (.com, .net, .org, .eu). If you purchase hosting package from us, you can also benefit from a free domain for one year for a new domain name of your personal choice.
You can register a domain now in a few steps and check whether the name you want is available.
Conclusion
In this article, we have shown you some of the most common methods for changing a domain name in WordPress. A combination of handy hosting tools and plugins can help you easily and quickly rename your online store or completely change the name and look of your project without having to build the entire WordPress site from scratch.
We have familiarized you with the technical details and risks of your SEO performance as you go through the process. Our team is available to provide advice and support throughout the entire domain change process, which is also included in our WordPress support plans.
*The article uses materials and media from the internet and the WordPress community.

