Your WordPress website needs hosting in order to function. The hosting service is the environment in which your website is stored. Sometimes it may be necessary to move your site from one host to another. The decision to move to a new hosting provider is usually made for various reasons—if you find a lower price for a hosting plan, quality of service, service, website loading issues, or others. Whatever the reason, it's a good idea to prepare your website for migration and then follow the necessary migration steps before moving your website. The structure of a website created with WordPress consists of two main elements:
- Files
- Database
In order for the migration process to take place, both objects must be prepared for the move.
In this article, we will show you all the steps required to successfully migrate your WordPress website to a new hosting account—from selecting a suitable hosting plan to the physical move and the final settings of the website that has already been moved.
Migration preparation
As we mentioned at the beginning, the WordPress platform physically consists of two elements:
-Files that manage the system, as most of them are written in PHP (the file extension in the structure is usually .php). Here you can also see the file structure of the installation itself as follows:
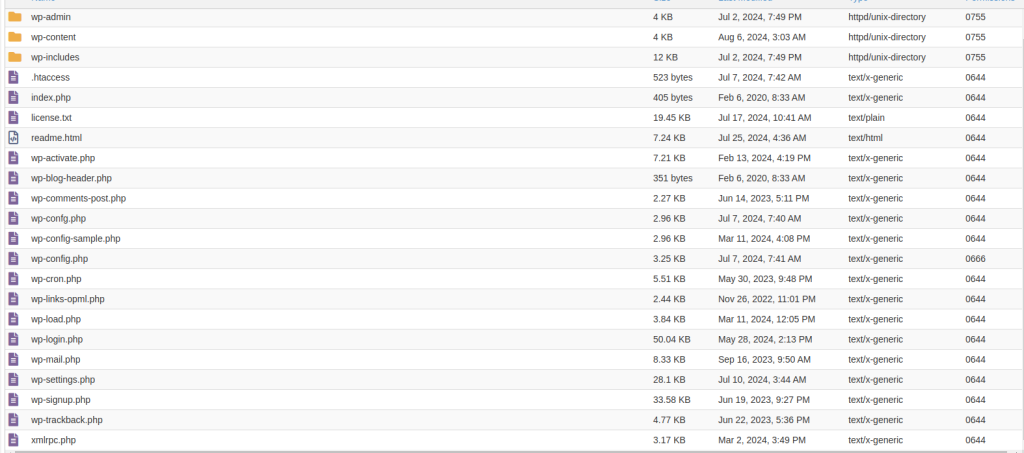
Since the tree contains many directories and files, you will need to create an archive of these items in a single file that can be conveniently moved in preparation for the migration. We will also look at an alternative method of moving the files using FTP without the need to create an archive.
The database - This is the element that the scripts use to store all the dynamic information about your website (settings, posts, articles, etc.). The database consists of individual tables that contain all the important elements of your website. An example of a database structure looks like this:
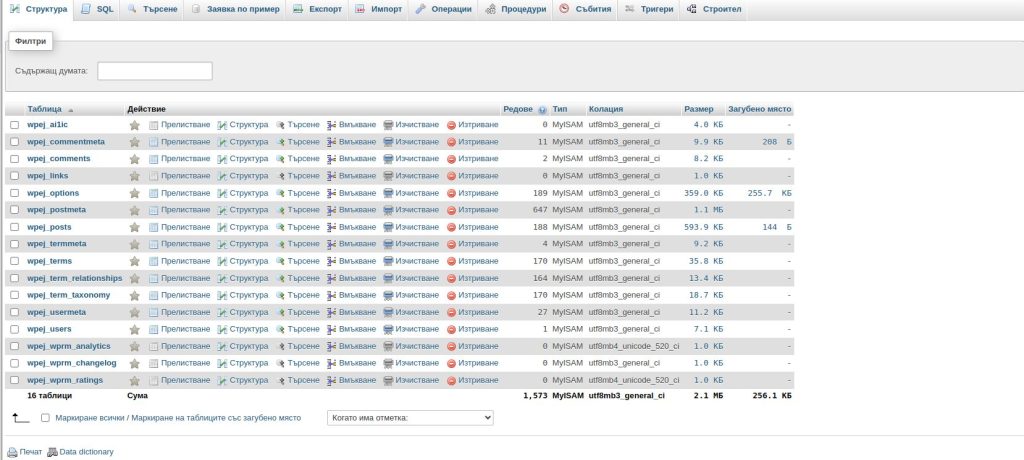
The migration preparation requires that we prepare these two WordPress elements for their physical relocation without losing the information they contain.
Choosing a New Hosting Plan
When migrating our WordPress website, it is very important that we choose the right hosting plan to provide the necessary resources to run our application. Here are some quick guidelines to keep in mind when choosing a hosting plan.
The plan covers the disk space required to run our website. Before you decide on a new plan, you should check how much storage space our WordPress installation takes up. We can do this quickly and easily with the tools that cPanel offers us, especially the Disk Usage tool.

With this tool, we get a breakdown of the size of the installation in question, and with this information, we can easily find out how much disk space we need.

Are the system resources in the new plan sufficient to run our application? The cPanel information visible in the information field of the hosting account can also help here:

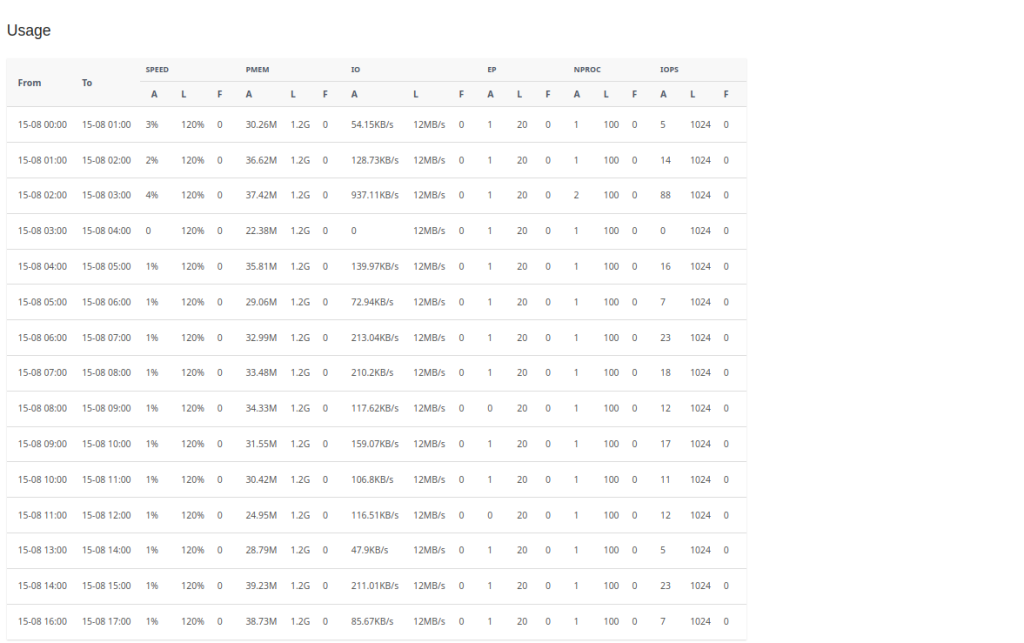
If you want to check resource usage over a longer period of time, you can use the Resource Usage tool.

Here you can obtain detailed information about the system resources that your website is currently using.
The WordPress hosting plans at Hosting Jump are optimized for the requirements of the WordPress platform. Thanks to the LiteSpeed server with integrated caching that we use, your WordPress website will run fast.
If you have any difficulties in choosing a hosting plan, you can contact our team, who will carry out all the checks for you and recommend the most suitable hosting plan for your application.
Decide on Migration Method: Manual vs. Automated
The methods for moving your application are manual and automatic. Both methods have their advantages and disadvantages, and we will try to familiarize you with them:
Manual migration
With manual migration, you must move each individual element of the installation (files and database) one after the other and patch the files after migration. The files are copied one-to-one to the new hosting or from an archive file of the current state. Configuration files such as wp-config.php contain the details of the old database and the user for it, which then have to be corrected after the database has been moved. Another disadvantage is that the database has to be created manually, as well as the user for it and the permissions, before we can move the contents of the database itself.
During the manual migration, if there is a change in the main domain, we also have to check all the tables and files and make a correction so that the website works correctly after the move.
The positive thing about this is that each of the example actions can be carried out independently of the other at any time and does not put a strain on the hosting plan's resources.
Automatic migration
With this way to migrate a WordPress site, we can emphasize as a negative side that all actions are performed automatically—backup, creating a new database, copying the information, changing the domain in the tables, etc.—without the user having control over any of the elements. In most cases, these actions are performed simultaneously, which requires large system resources and a high load on the hosting plan.
Often ready-made plugins such as Duplicator, WP Migrate, and WPvivid Backup are used for automatic migration. Each of them not only consumes system resources like a plugin but also creates a load, especially during input/output operations, especially when moving a website with more than 10 GB. This often results in resources such as CPU and memory being overloaded and errors, as well as the very common timeout errors, occurring because these plugins take too much time to perform the specified operations. The advantage is that you do not have to make any manual changes to the file structure of the application after the automatic migration.
The choice of migration method is very specific and requires serious knowledge. You can also contact our team at any time for assistance with the move.
How to Migrate Your WordPress Site to a New Web Host Manually
We present the most important steps that need to be performed for the correct moving and functioning of your application in the new hosting account during the manual migration. Each of these steps must be refined in the order indicated:
- Archiving and preparing the website for the move;
- Prepare the new hosting account for the move;
- Create and import the database;
- Upload the working files of the website to the new hosting;
- Modify the configuration files;
- Change the DNS records of the domain;
- Test the functionality of the website from the new location.
1. Backup Your Website
As we have already learned, every single WordPress website consists of two main elements: a file structure and a database.
In this step, we will look at how to prepare both elements for the move to the new hosting. If our website is an active online store and we do not want to miss any orders during the transfer to the new hosting, we advise you to temporarily restrict access to the website or prepare the archive itself in a period of time when there is as little traffic on the website as possible.
Another option is to use a scheduled maintenance plugin to inform customers about the maintenance work. Examples of such plugins are WP Maintenance Mode, Simple Maintenance, Slim Maintenance Mode, and others.
1.1 Backing up the File Structure of the Old Site
Before we start archiving the website files, we need to make sure that we have enough disk space on the hosting system to store the archive. For example, if our website is 10 GB in size, we should have at least 5 GB of free disk space.
We will show you different methods for backing up your files, depending on what access you have.
File manager of the hosting plan
Most hosting offers have a File Manager, with which you can quickly and conveniently check the files of the installation. In this example, we will show you how to use cPanel's File Manager to create a backup of the file structure:
Step 1: Open File Manager from your cPanel

Step 2: Select the installation directory to be moved, mark it, and click on it with the right mouse button:

Select the “Compress” option. In the window that opens, you have the option of selecting the type of archive, the name of the file, and the directory of the host in which it should be located:

Once you have selected the desired archive, click on the "Compress files" button and wait until the process is complete.


We have now created the backup file and can download it locally to our device by right-clicking on the file and selecting the “Download” option.

Using SSH access
If your current hosting plan offers you SSH access to the server, we will show you two direct commands that you can use to create an archive via the server's command line. The details for SSH access can be found in your service information or are usually sent to you by email. Once you have logged in to the server with your user and accessed the installation directory, you can use the following commands depending on the type of archive you want to create:
- for zip archive
zip -r <filename>installation directory/
Example command:
zip -r test65.zip test65.net/In this case, the -r option specifies that a recursive archive is created, i.e., that all subdirectories and files in the specified directory are included.
After executing the command, we can see how the files are added to the test65.zip archive:

The archive file has been created and is now available in our home directory or at the location specified by us:

- for tar archive
If we want to have our archive file in .tar format, we can use the following command:
tar -cvf <filename> Installation path/
Here is an example of the execution of the command:
tar -cvf test65.tar test65.net/With the -c (create) option, you specify the file to be created; with the -v option, you get a preview of the process, while the -f (file) option specifies the name of the file that is specified immediately afterward, in our example test65.tar. Here, subdirectories and the files they contain are saved by default, so no additional option is required.
Once we have executed the command, we can see how the files are added to the test65.tar archive:

The archive file has been created and is now available in our home directory or in the location we specified:

1.2 Export the Database
In the following steps, we will show you how to back up the second element of our WordPress website, namely the database.
First, however, we need to make sure which database it is, so we check it in the wp-config.php file in the domain's working directory. It is described in the following order:
/** The name of the database for WordPress */
define( 'DB_NAME', 'fourthwa_wp65' );
Once we know which database it is, we can proceed with the backup:
Using phpMyAdmin
The most widely used database tool is phpMyAdmin. It is easy and accessible to work with the database as it has many features. For cPanel users, it is located in the Database section:

Here are the necessary steps to create a backup of our database. We start phpMyAdmin, and on the start screen, we see all active databases. We select the base specified in the configuration file:

The next step is to export the selected database. To do this, click on the Export button after selecting the database:

When exporting the database, we are asked where the database archive should be saved on the local drive, with the name of the database and .sql, for example, fourthwa_wp65.sql.
Using the WordPress Command Line Interpreter (CLI);
If you have SSH access to the hosting and WP-CLI is enabled, you can use this function to export the database. After you have logged in to the server, go to the working directory of the installation and enter the following command in the command line:
$ wp db export ~/wpdump.sqlIn this case, you do not need to specify and search for the name of the database, as the command itself finds the database for the installation and exports it to the host's home directory under the name wpdump.sql. You can change the directory and the file name as you wish. You can then download the created archive to the local drive.
If the steps described are difficult for you, you can always use a ready-made backup plugin. Here are some of the most common ones:
Duplicate Pro, Solid Backups, BackWPup and others. Each of them works with One Click, and you can quickly and conveniently create an archive with both elements—files and database.
We are now ready to move on to the next step of the migration.
2. Set Up Your New Hosting Account
Now that we have already prepared an archive of the website, we need to take some preparatory steps for the new hosting account.
If you have not purchased a hosting service yet, do it now and order WordPress hosting from Hosting Jump.

Once you have purchased the plan, you need to access it. The easiest way to do this is via your client profile. Select Menu -> My services and click on the hosting you have purchased in the list of services:

From Quick Links, select "Login to cPanel".
Here we will look at two main options:
- Moving a website that belongs to the main domain of the hosting plan
- Moving a website to an already existing hosting plan as an additional domain to it.
2.1 Moving a Site That Is Main to the Hosting Plan
When working with the main domain of the hosting plan, we should know that with cPanel, the main working directory of the main domain is always public_html. To prepare our new hosting for the website transfer, we need to make sure that public_html is empty and does not contain any other installation files. At this point, it is important to mention that you do not need to install WordPress via Softaculous if you have purchased the package, as we will be migrating the already existing website manually. Once you have verified that the public_html directory does not contain any installation or other files, you can proceed to the next step.
If it does contain files, you can delete them via the File Manager by first checking if there are other domains and subdomains in the public_html directory.
2.2 Moving a Website to an Existing Hosting Package as an Additional Domain to This One
To move your WordPress site to an existing hosting, you must add the domain to the hosting via cPanel. Here you can see how to do this in just a few steps:
Step 1: In cPanel, select the Domains field

Step 2: On the field screen, click on the Create a new domain button

Step 3: Enter the domain associated with your website. The remaining fields are filled in automatically. If you want to change the name of the directory where the domain files are located, you can change the second field.

After you click the Submit button, the domain will be added to your hosting plan and an empty directory will be created in the hosting structure, depending on the domain name you have chosen.

You can also use the file manager to check that there are no files in the directory.


And here it is imperative that you do not install WordPress via Softaculous, as the working directory of the domain must be empty in order to copy the files of the existing website there.
3. Create and Import Database
Once the hosting is ready, you can start with the actual move. We recommend that you start with the database by following these steps:
Step 1: Create a new database via cPanel
In the cPanel Database field, select Manage my Databases:

Step 2: Choose a name for the new database and click on the Create Database button.

IMPORTANT! Save the name of the database, as it must be described in the configuration files.
Step 3: Create a user from the same field that you will then connect to the database and click on the Create user button:

IMPORTANT: Save the user and password beforehand, as they must be specified in the configuration files.
Step 4: Once you have a database and a user, the next step is to connect them:

Step 5: Set the user's rights so that they have full access to the database:

Import the database into the created database of the new hosting.
Here we will show several options for importing the database to the new hosting.
Import via phpMyAdmin
In order to import the archive of the database into the newly created one, it is necessary to follow the following steps:
Step 1: Open phpMyAdmin and select the newly created database:

Step 2: Select the Import button and press it:

Step 3: In the File to Import field, select the database archive that we created in Point 1 (in our case, wpdump.sql):

After selecting the file, press the Import button and wait for the process to finish.

Once the process is complete, you can import all the tables from your website's database into the database we have created.

Import via the WordPress Command Line Interpreter (WP-CLI)
If you have SSH access, you can also import the database via the WP CLI. To use this command, you must first upload the database backup file to the hosting with the FileManager. Select the Upload button in the menu and upload the wpdump.sql file from your local drive to the hosting directory of the test65.net domain:


After you have established an SSH connection to the server, access the domain directory and execute the following command there:
wp db import wpdump.sql
After the execution, you will receive the following response:
Success: Imported from 'wpdump.sql'.
IMPORTANT! This method for importing the database can only be used if you have previously copied the installation files into the directory and corrected the database and user data in the wp-config.php file.
4. Upload Site Files to the New Host
After you have imported the database, the next step is to transfer the archive with the site files. Here again, we will show you several methods of how you can most easily do this.
4.1. FileManager
Open FileManager and select the working directory of the domain in which you want to store the files from the archive. Use the Upload button to place the file there.
If the file is already in the directory, right-click on it and select the Extract option:

Once you have selected the directory to which the file is to be extracted, click on Extract files and wait until the process is complete.


In the domain directory, the file structure should look like this:
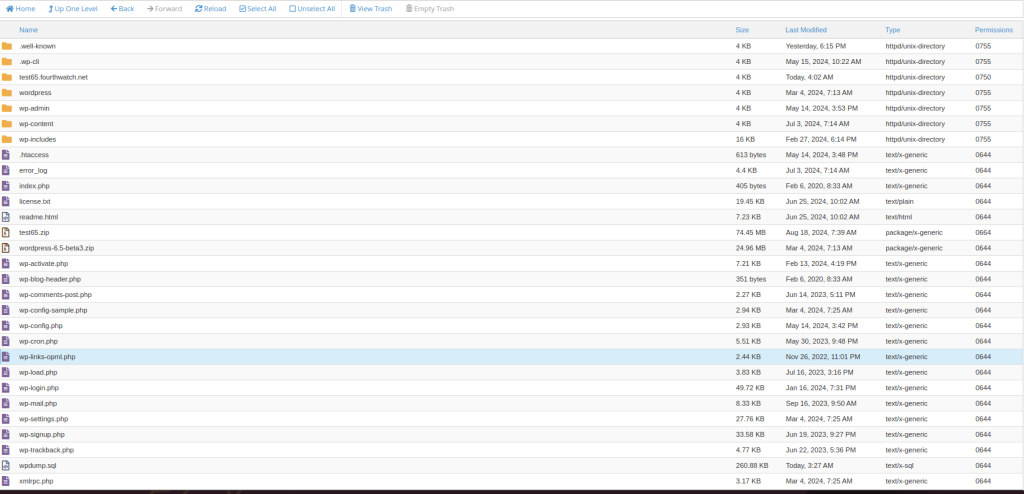
This completes the process of physically moving the files. In this process, it does not matter whether the format is .zip, .tar, or tar.gz.
4.2. Using an SSH connection
If you have SSH access, you can unzip the archive uploaded to the hosting via the command line. Here are the commands you can use:
For a .zip archive, use the following command:
unzip demo.zip -d destination As an example, the command should look like this:
unzip test65.zip -d /home/fourthwa/test65.net/Important! Execute the command in the directory where the archive is located. Wait until the process is complete:

For a .tar archive, use the following command:
tar -xvf demo.tar -C /path/to/destinationAs an example, the command should look like this:
tar -xvf test65.tar -C /home/fourthwa/test65.net/Important! Execute the command in the directory where the archive is located. Wait until the process is complete:

4.3. Using FTP to upload the files to the hosting
Here we will show you how to upload your installation files directly from your device without having to go through the whole process of backing up files. For this purpose, we use an FTP client (FileZilla). You need to install the FTP client on your device and enter the connection details:
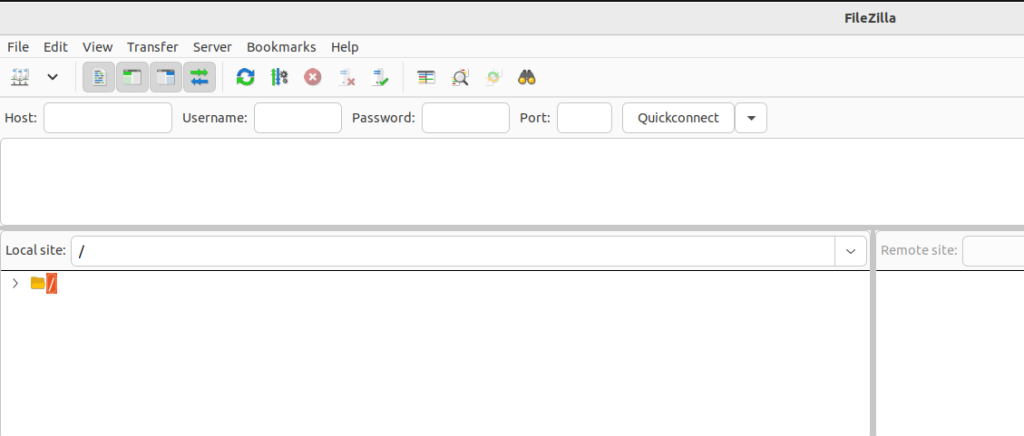
The data you need is your cPanel data and the address of the server on which your hosting plan runs. When you registered your hosting account, you received a letter describing all these details.
After you have connected to the server, you will see two windows: local page and remote page.
The local window is the content of your local device, and the remote window is the content of the hosting.
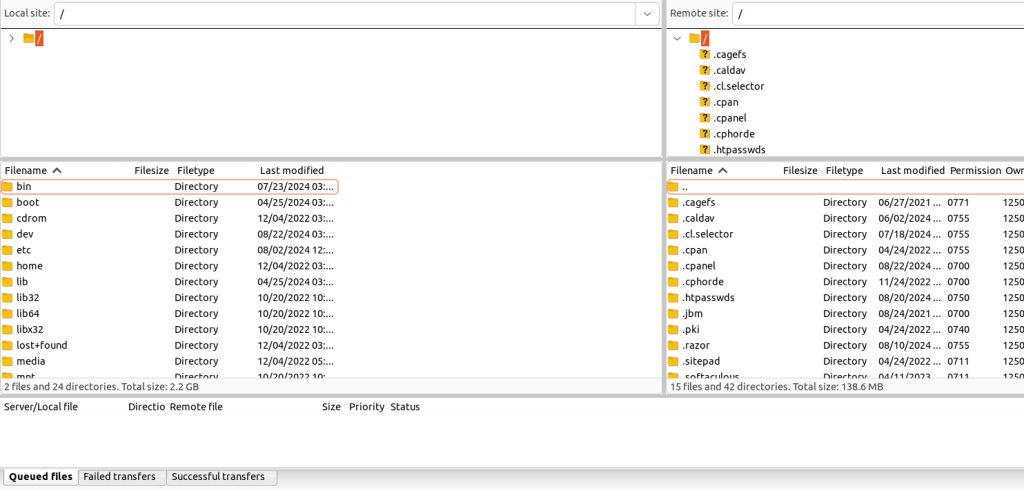
Select the directory with your installation on the local drive and highlight all the directories and files in it.

Move the selected WordPress files to the hosting directory located in the remote site window using drag & drop:

Files will begin to copy from the local drive to the hosting plan

After the process is complete, you can compare the two windows, and they should be exactly the same in terms of information. This will mean that the local installation has been successfully transferred to the hosting plan.

This completes the process of physically transferring the files.
5. Update Configuration Files
After you have moved the hosting installation, it is necessary to configure the connection between the database and the files. This configuration is carried out in the wp-config.php file. Instead of the previous data, the data of the new database that we created in point 3 must be described. The information can be found in the following lines of the file:
// ** Database settings - You can get this info from your web host ** //
/** The name of the database for WordPress */
define( 'DB_NAME', 'fourthwa_wp65' );
/** Database username */
define( 'DB_USER', 'fourthwa_wp65' );
/** Database password */
define( 'DB_PASSWORD', 'SomePasword123%^%’' );
/** Database hostname */
define( 'DB_HOST', 'localhost' );
After the change from our example, these lines should look like this:
// ** Database settings - You can get this info from your web host ** //
/** The name of the database for WordPress */
define( 'DB_NAME', 'fourthwa_test65dbase' );
/** Database username */
define( 'DB_USER', 'fourthwa_test65user' );
/** Database password */
define( 'DB_PASSWORD', 'NewPassword123%^&' );
/** Database hostname */
define( 'DB_HOST', 'localhost' );
You can edit the file via FileManager by right-clicking on the file name and selecting the Edit option:

6. Change DNS Settings
The website is now configured on the new hosting, and to start loading, the next option is to point the NS domain to the hosting plan. You can view the DNS servers in your client profile under My Services by selecting the relevant hosting plan.

The forwarding takes place via the panel from which you purchased the domain.
7. Verify the New Site
In this point, we will show you how to check the performance of the website after moving to the new hosting. Since it takes about 24 hours for a full global DNS refresh to be performed after the domain has been moved, you can use a hosts file to check whether the website has been moved correctly. On Windows-based systems, the file can be found in the following location:
C:\Windows\System32\drivers\etc
You can edit the file as follows:
notepad c:\windows\system32\drivers\etc\hosts

The format of the entry should be as follows:
(IP Address) (URL) #(Comment)
You can get the new server address from your cPanel:

With the example given, the entry would look like this:
79.98.104.3 test65.net www.test65.net
When the domain is typed into the browser, it will be loaded directly from the specified hosting address. This way we can test our site's features before the domain is fully committed to hosting.
On Linux-based systems, the file is located in /etc/hosts.
Transfer a WordPress Site to Another Host With a Plugin
WordPress offers the possibility to automatically transfer the site, through a special WordPress migration plugin that performs all the described actions automatically.
The most common are the Duplicator and the All-In-One WP Migration plugins. In this point, we will show you how to use the All-in-One WP Migration plugin.
Important! The All-in-One WP Migration plugin by default works with a 256 MB upload file size. If the archive of your site is larger than this size, you can make a correction to this PHP parameter so that the plugin can work normally. This plugin requires that you have previously installed a clean WordPress via Softaculous on the new hosting.
Here are some easy steps to use the plugin:
- Install and activate the All-in-One WP Migration plugin on the old and new installation of your site.
- Log in to the site control panel of the old installation and select All-in-One WP Migration → Export from there.

- Press the button Export → File. This plugin will compress all the content of your site into one WPRESS file.
- After the process is complete, a link will appear to download the file to the local drive.

- Log in to the admin panel of the site in the new hosting. From there, select All-in-One WP Migration → Import.
- Choose Import From → File and upload the file you downloaded in Step 4 to your local drive.

If the process slows down or returns an error, you can use FileManager or FTP to upload the archive to the hosting.
- Once the backup is on the hosting, open All-in-One WP Migration → Backups. The backup file should appear in the restore list.
- Tap on the three dots and select the Restore option.

- Click on the Proceed button to start the import process.
Need a Reliable New Hosting and a Seamless WordPress Migration?
Our WordPress hosting plans are tailored to your business needs and you can choose between plans optimized for both blogs and online stores. Our technical team will perform a FREE migration for you. You choose when it's most convenient for you to move your WordPress website to us. You will also receive compensation for the remaining months with the other hosting provider. Here's how it looks: we will add up to 12 months to your hosting account with us for free, which is equal to the number of months you have left with the other hosting company. Do not hesitate and send us a migration request right now.
Conclusion
Finally, we can point out the most important things when migrating the website:
- Choosing the right hosting plan with the right parameters to meet the needs of the website.
- The choice of migration method to ensure that the website is moved without loss of information.
- Testing immediately after the site migration and adapting the parameters of the new hosting to the parameters of the old hosting (PHP version, modules, plugins, etc.)
The methods we have offered you are specific and require in-depth knowledge, and you can choose the one that is most convenient for you. It is important that you keep an archive of the website and database so that you have the most up-to-date backup data possible. In our plans, an archive is created daily up to 7 days back, and you can quickly and easily restore your website to the desired state.
*Materials from the Internet and the WordPress community are used.

