With dynamically developing technologies, every user today expects a website to load quickly. This can be achieved in various ways, but the most important is the so-called cache.
But what does cache mean?
When a user loads a website, a copy of the displayed page is saved on their device (laptop, phone, tablet, etc.). This way, the information is displayed much faster the next time it is loaded. This is called the browser cache.
The speed at which a website loads also benefits your search engine optimization (SEO) efforts. In other words, a site’s speed has a significant impact on its ranking in search engines such as Google, Bing, etc.
Caching and all-in-one site acceleration can be a daunting task for many people.
Considerable knowledge of programming languages, especially those used to develop websites, is required for every site owner. This is where LiteSpeed Cache and the specially developed optimization plugins come into play. Thanks to them, you can create a cache and improve the loading speed of the website without having extensive programming knowledge. Scripts have been developed for this purpose, which can be activated easily and conveniently using buttons.
In this material, we will look at what LiteSpeed Cache is, which systems can benefit from it, and how to configure the WordPress plugin correctly to achieve the best results and improve the loading speed of the website.
What Is LiteSpeed Cache and What Are Its Advantages?
LiteSpeed Cache, or LSCache, is an efficient, highly configurable server-level caching engine for web content and a collection of optimization features. Its main advantages are:
- Improves the dynamic loading of websites (typically PHP websites)
- Improves the loading of static content (such as images)
- Significantly reduces the consumption of system resources
Looking to improve your site's load speed? Compare Autoptimize vs LiteSpeed in our latest post and find out which one is right for you.
Is Litespeed Cache Free?
Yes, LiteSpeed Cache is a completely free and open source WordPress plugin. It is integrated into the LiteSpeed web server. Plugins for content management systems (CMS) are also free of charge.
However, note that there are fees associated with some LiteSpeed server editions, such as LiteSpeed Enterprise. In contrast, OpenLiteSpeed doesn't cost anything.
LiteSpeed Cache Plugins
LiteSpeed has ensured that larger standard systems have an easy way to manage their cache via plugins. This gives the user more control and more accessibility, and for advanced users, there are options for fine-tuning.
The LSCache plugin is compatible with the following platforms:
- WordPress
- Joomla
- OpenCart
- Prestashop
- Magento
- Drupal
- Laravel
- XenForo
- MediaWiki
- Craft CMS
Why Is a Cache Important?
We have already given some information about this at the beginning, but let us look at this aspect in a little more detail.
Many years ago, websites were much simpler, and the size served to users was in the order of kilobytes. With the advancement of LiteSpeed technologies, this aspect has already changed considerably.
The website itself must be extremely beautiful and functional (remember what websites looked like before the year 2000?), but this leads to its "weight" or loading a lot more resources. For this reason, the use of cache is now a mandatory factor in speed optimization on WordPress and all other platforms. Its purpose is to make your website lighter.
But How Does the LiteSpeed Cache Feature Do That?
Most websites are built with dynamic content that is made available to the user when the page is loaded. The problem is that this content comes from multiple sources/files, is generated (e.g., if the page was created in PHP), and is only then made available to the client. This process can often take up a considerable amount of system resources and be slow.
Being one of the best cache plugins available, LiteSpeed Cache uses the "page cache" method, which takes all these dynamic resources and creates a copy of your page in a static HTML version. This way, the next user who "requests" this content will be served much faster and more efficiently. All of this is possible thanks to the LSCache Module that’s included in the LiteSpeed Web Server licensed copy.
Those of you in the know might mention that often pages with changes or sample content should not be cached. Of course, LiteSpeed has thought of these and other options. Their plugins offer the ability to clean the cache, disable the cache for individual elements, and much more. What’s more, the vast majority of plugins and themes are compatible with the LiteSpeed Cache for WordPress. Notable examples include WooCommerce, Yoast SEO, and other helpful optimization plugins as well as the best SEO-friendly WordPress themes.
How to Use LiteSpeed Cache for WordPress?
WordPress is the most widely used CMS system. LiteSpeed WordPress plugin includes free generation of critical CSS files, enhancing performance with optimized caching and improved loading speeds.
Below, we will show you how to install LiteSpeed Cache for WordPress plugin (LSCWP) and how to configure it at a basic and advanced level. Let us continue with the concrete steps.
How to Install the LiteSpeed Cache Plugin for WordPress
- Open the admin panel (wp-admin) of your website.
- From the left navigation, select “Plugins” -> “Add new plugins”.

- There is a plugin search field at the top right of this page. Enter the text “LiteSpeed Cache” there.
- In the center window for the first result, you should see “LiteSpeed cache”.
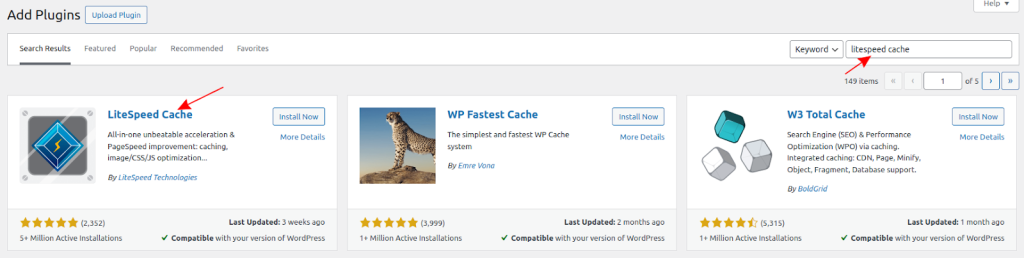
- In the image above, you can see that there is an “Install” button. Press it and wait a few seconds.
- After installation, the button will change to “Activate”, then press it.
That's all you need to do to install LSCache for WordPress. Once you have completed these steps, you can start using the LiteSpeed Cache plugin for your site. With installation, some options are enabled by default, but there are also disabled options. We will take a closer look at these below.
Configuring the LiteSpeed Cache Plugin for Your WordPress Site
The LSCWP was created by the developers of the LiteSpeed web server software that we at Hosting Jump use to provide our services.
Basic Configuration of the LiteSpeed Cache for WordPress
Here we look at the options you can enable that are unlikely to cause any difficulties loading your website correctly. All settings are accessible via the WordPress admin panel - > LiteSpeed Cache (in the left menu).
1. category general
Domain key: Select the "Request domain key" button on the right. The option itself is not technically an optimization feature but is required for other optimizations, which we will discuss below. Please note that the generation of the key itself can take several minutes.
Server IP: Enter the IP address of the server on which your website is located. LiteSpeed's cloud servers will then address this address directly and not the domain name. This saves time due to DNS blocking.
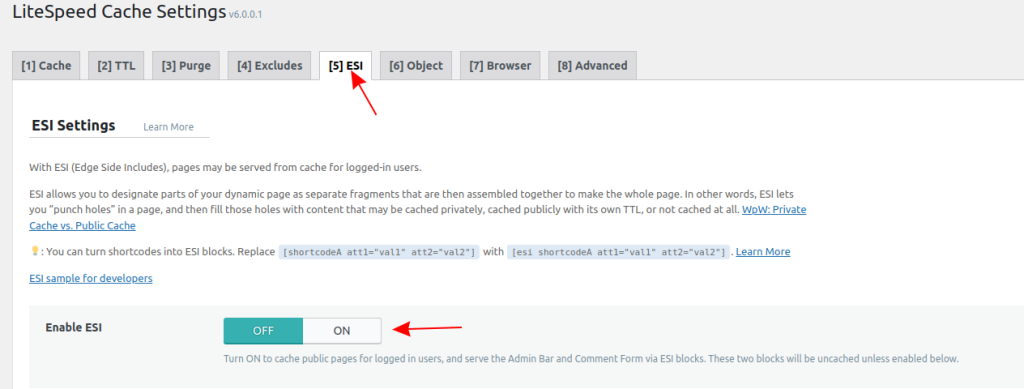
2. category cache
ESI tab: Activate the first option, “Enable ESI.” This can significantly speed up the loading of the admin panel. Use this option to activate the cache for logged-in users.
Browser tab: From here you can activate the browser cache option. Although this type of cache is active at the server level, from this menu you have the option to set the cache expiration time/Browser cache TTL. With the default settings, the value is “31557600,” which equals 1 year.
This is the recommended value from Google, and when checking with a PageSpeed tool, you will not get a warning about it. Also, your PageScore will be higher.
3. category Page Optimization
- HTML Settings tab
The options we recommend enabling are:
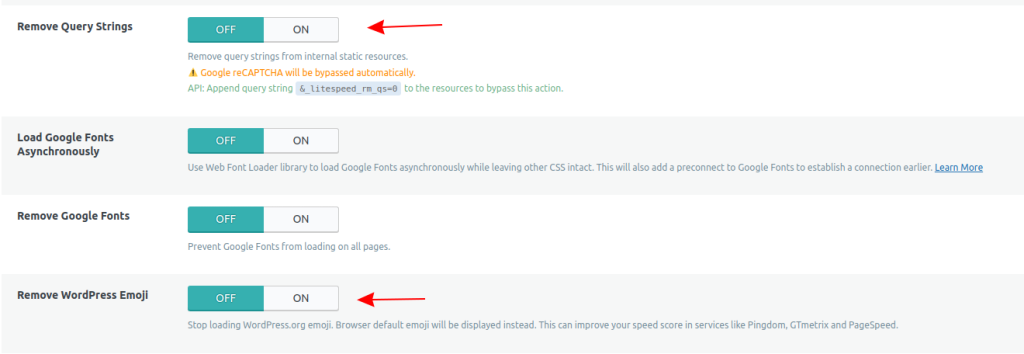
DNS Prefetch: Enter the domain name of your page in the format “//domain.com”.
DNS Prefetch Control: On

Remove Query Strings: On
Let us pay a little more attention to this option. You may have noticed that some files on your website are named “…name.css?ver=6.2.2”. If you remove the query strings, only the last part will be removed, and the file will end in .css. In this way, you ensure that the caching of static files works correctly. If a file version changes, the cache must be emptied. We will go into this later.
Optional: You can also remove the WordPress Emoji if you do not use them.
Recommended Configuration of the LiteSpeed Cache Plugin for WordPress
These are the options that we recommend activating and should not usually cause any problems with the correct loading of your website.
- All the basic settings we have described above
- Category Cache
- Section Object
Firstly, you need to familiarize yourself with which object cache your hosting provider supports. Hosting Jump customers can take advantage of the Redis Object Cache. The instance activation itself takes place via cPanel.
Once you have the necessary information, tick the "Object Cache" box, select whether you want to use Redis or Memcached, and fill in the "Host" and "Port" fields.
Please note that if you use more than one WordPress site and Redis for them, you must enter a different value for "Redis Database ID" for EACH website: from 1 to 15.
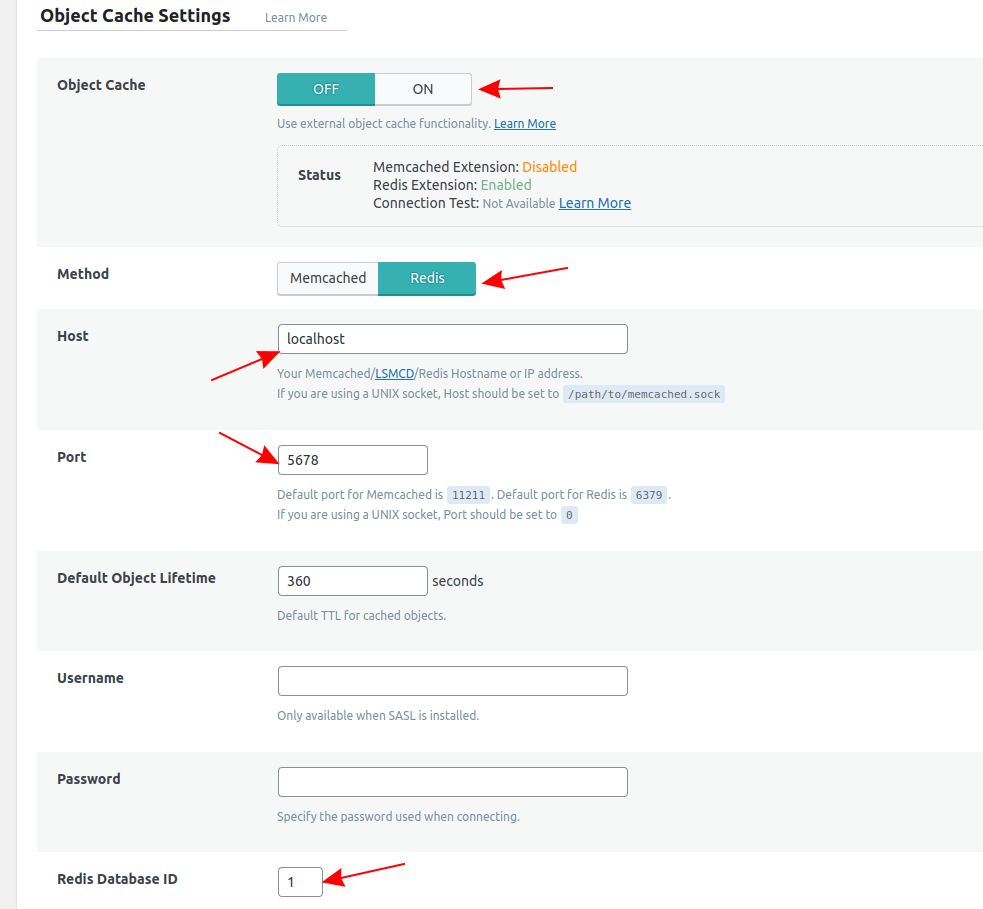
If your hosting provider tells you that you need to use a username and password, you will, of course, also enter this data (typical for memcached).
Explore our in-depth article on speeding up performance with Redis caching to achieve optimal results.
3. category Image optimization
Image optimization is a very important process that can significantly improve the loading times of your website. In our practice, we often see that a webp version can be up to 60–70% smaller than the original file. A smaller size also means faster loading on the client side. We would like to point out at this point that we do NOT recommend adding images larger than 300 KB.
- Section "Settings for image optimization": Before you continue with the actual image optimization with LiteSpeed Cache, you need to change some settings, namely:
Auto request cron: Activate this option. This means that when you upload a new image, it is automatically optimized.
Image WebP Replacement: Automatically replaces images with their webp version.
- Section “Image Optimization Summary”
The optimization itself does not take place locally but on a remote LiteSpeed server. The first request (the “Send Optimization Request” button) only sends one image. The second request sends 20, and so it goes on until 200.
This is done so that the first requests can check whether the communication between your server or the server hosting your website and LiteSpeed's server is correct.
We emphasize this because users are often under the impression that they have to go through this process for every image when this is not the case. The scale for this number is progressive.
In another article, we cover the topic of image optimization with LiteSpeed Cache in detail, so follow the link to discover how it's done.
4. category Page optimization ( CSS/JS minify, Media settings )
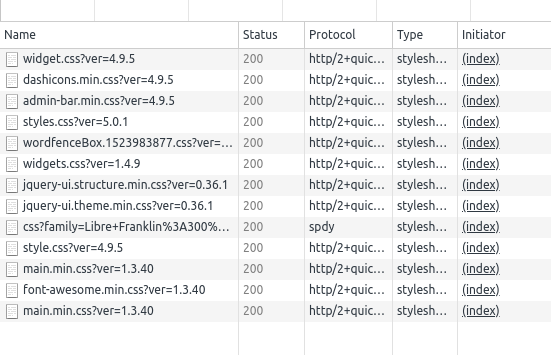
In the following, we will mainly describe the activation of Minify. In short, it is a process for removing superfluous content from a CSS/JS/HTML file. This mainly involves whitespace and comments. In this way, the size of the file itself is reduced and it loads faster as a result. We will show you visually what this looks like:
Before:
After:

- Section CSS Settings
Enable “CSS Minify”
- Section “JS Settings”
Enable “JS Minify”
- Section “HTML Settings”
Enable “HTML Minify”
IMPORTANT!!! Please note that in rare cases, activating these options may result in CSS/JS files not loading correctly. You can find out how to solve this problem in the advanced section. However, if you do not wish to carry out these steps, you can also deactivate the problematic options.
5. Category "Database"
Before we look at the options for database optimization themselves, we would like to give you more information about “post revisions". When you write a new post, the information it contains is automatically saved after a certain time, and then a "post revision" is created, or in other words, a version of the publication.
The option itself is very good because you can revert this post to an earlier version if necessary, but this also has its drawbacks.
Every revision is recorded in the database, and so an enormous amount of unnecessary information is often imported and stored. Over time, there can be a noticeable delay in loading your website, precisely because of a large/problematic database. To avoid this, LiteSpeed offers several options:
- Section “DB Optimization Settings”
There are no ideal values for the two options “Maximum number of revisions” and “Maximum age of revisions.” Depending on how often you use the revisions option, you can make these settings. It may be advisable to set the number to 5 and the time to 10.
Advanced Configuration of the LiteSpeed Cache Plugin
Everything we have mentioned above should not hurt your website. If you are happy with the results, we recommend you stop here. Any of the options below can "break" your website to some degree.
IMPORTANT!!! We would like to point out that you can undo any action by simply deactivating the options you have activated.
Before you start making changes, we recommend that you make them during a period when there is little traffic on your website.
1. “General” category
- Section General Settings
Here you can activate the first option, “Update automatically." This will automatically update the plugin itself. LiteSpeed often has the practice that when a new option is published, it is no longer available by default. This avoids problems after updates, but it is still possible that there are bugs in the plugin.
2. Section "Cache"
- Section Exclude
You have the option of entering addresses, categories, cookies, and more, which are then excluded from the cache. We do not necessarily recommend using this option. If a part should not be cached, it is better to put it in an ESI block. You can find more information on this here.
3. Section “Page Optimization”
- Section CSS Settings
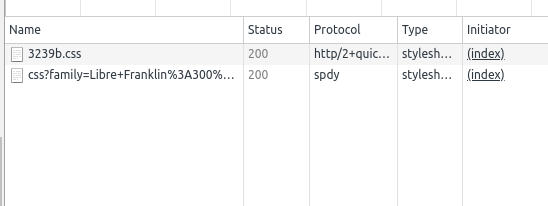
CSS Combine: Combine a group of CSS files into one. This will reduce the total number of requests to your site. We provide you with an illustrative example:
Before:
After:
If a CSS file does not function correctly after this procedure, you have the option of excluding it from the optimization. To do this, access the "Setting - CSS" section and in the CSS field “Exclude file name/address.”
Load CSS Asynchronously: Asynchronous loading of non-critical CSS files. This can significantly improve the speed of your WordPress website and eliminate "Render Block" style issues in PageSpeed tests.
Font Display Optimization: This option adds “Font-display” to all @font-face
- Section JS Settings
JS Combine: It is how the CSS option combines multiple JS files into one. Please note that you can specify files that in the "Tuning" section you can specify files that will not be included in this optimization.
Load JS Deferred: It is advisable to test the Deferred option, which can improve the PageScore result.
- Section Media Settings
The most important options here relate to “Lazy Load”. This can be very useful if you have a lot of images on a page. When the user loads the page, not all images are loaded, but only the ones the client sees. When he scrolls down, they are loaded. In this way, you can significantly influence the selected requests that the page performs.
As there is no standardization when creating WordPress themes, there may be difficulties loading the image, but we strongly recommend that you test this option. We focus on such features as “Preload Featured Images”, “Lazy Load Images” and “Add Missing Sizes.”
If you have added iframes, also activate “Lazy Load Iframes.”
We pay special attention to “Basic Image Placeholder”. If lazy load is activated, you may notice for a fraction of a second that a gray image appears in its place before the image is loaded. You can use this option to set it so that it is not gray but a different color.
The LiteSpeed Cache plugin for WordPress comes with the free cloud content delivery network (CDN) for dynamic cache QUIC.cloud CDN. You’ll have access to their low-quality image placeholder (LQIP). This means smaller and low-quality images will be displayed while their high-quality version loads.
- Section VPI
This section is directly related to Lazy Load. If you do not want the first images that are loaded when the page is opened to be Lazy Load, activate both options here.
- Section Localisation
"Gravatar Cache" and "Gravatar Cache Cron" can be enabled. If you do not know what a Gravatar is, you can get more information here.
Other Situational Options
The LiteSpeed Cache plugin also offers many situational options. We will look at these below, but you should bear in mind that they are not always applicable or practical. Depending on the nature of your website, consider whether it makes sense to use them:
1. general category
- Section General Settings
The "Guest mode" option provides each user with a cached version of the website. If there is new content, an additional AJAX request is made to retrieve and upload the new content.
If your website is static, this option is great, but it is not useful for a dynamic website. Also note that an additional POST request is made, which may require additional system resources.
2. cache category
- Section Cache
“Cache mobile” creates a cached version for mobile devices. An extensive POST request is also created here, which can lead to your website being temporarily delayed.
- Section “Advanced”
The "Instant click" option: When a user moves the mouse over a link, this link is loaded. This creates a cache before the user has even clicked on it, and the page loads much faster.
IMPORTANT!!! This option can consume an enormous amount of system resources. We recommend that you only activate it if you have enough of them.
3. CDN category
With the QUIC.cloud CDN service or CloudFlare, you can connect the WordPress installation to the CDN yourself.
We also recommend that you complete the options for CloudFlare if you are using it. This way you can also partially control its cache. These options can be found on the CDN settings tab.

4. Category Crawler
This is a bot that runs through certain URLs in a loop and saves them in the cache. This means that the first time a user visits the site, they are shown an optimized page. If the posts on your website are not updated often, this is a good option.
The configuration itself is done via the "Sitemap settings" tab. Here you only need to enter the address of your sitemap. If the domain name appears in it, also select the option "Remove domain from sitemap."
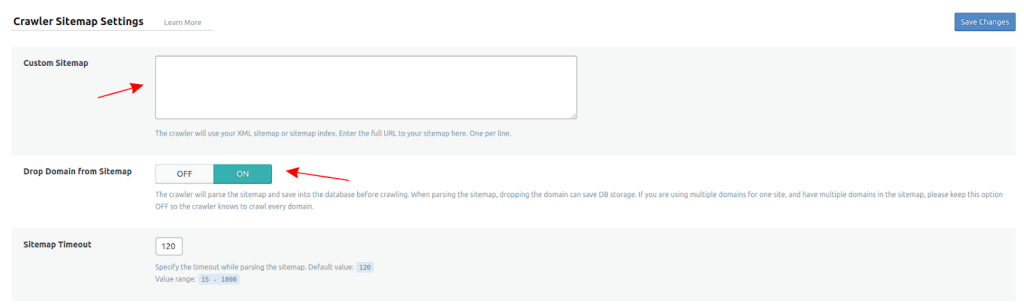
Then activate the “Crawler" option on the "General settings” tab. You can consider the other options, but no changes are required. However, if you wish and are familiar with the hosting environment, you can change them.
Clearing the Cache
Fortunately, cache management, including clearing the cache, is a very simple process. You don't need to delete any directories or anything like that.
In the WordPress admin panel, you will see the following icon:  in the top bar. If you hover over it with the mouse pointer, a drop-down menu opens. The options we are interested in are
- Purge All: Clears all cache, minifies, and combines files.
- Purge LSCache: Only clears the local cache.
- Purge CSS/JS cache: Clears JS/CSS cache only.
- If you have configured a CDN, you can also delete its cache.
It is recommended that you use the Purge All option, especially if you make frequent changes.
How Can Hosting Jump Help You?
Every customer who has trusted us and uses our WordPress support can benefit from having the plugin configured by us. Our team will activate all possible options that do not conflict with the theme or other plugins used.
Conclusion: LiteSpeed Cache for WordPress Plugin
Would you like to have a fast-loading website that ranks well in search? The solution is to use the LiteSpeed optimization plugin.
This new and advanced technology takes full advantage of the LiteSpeed web server. In combination with a plugin for your favorite CMS system, you can achieve good PageSpeed results and bring superior performance to your WordPress website.