One of the most important parameters when working with WordPress is the PHP memory limit, which ensures that plugins and scripts function correctly. They often fail to load because there isn't enough allocated memory, resulting in a memory limit error.
In this article, we’ll share the five most effective ways to increase the memory limit and prevent encountering this error in WordPress. Let’s begin.
What Is the PHP Memory Limit in WordPress?
PHP is a server-side scripting language. It is an open-source language developed for web programming and is often used to create server applications and dynamic web content. It generates the HTML pages of your website. PHP is a powerful programming language that can perform multiple operations such as calculations, executing processes, and requests from the WordPress application, but it requires available memory to do so.
The default memory limit for WordPress is 32 MB, but there is an option to increase this limit. For example, to work with WooCommerce, it is recommended that WordPress uses at least 64 MB.
When WordPress reaches its default memory limit, it will attempt to increase the memory used to 40 MB for a single site and 64 MB for a multisite installation. However, if the amount of memory allocated is not sufficient, you will receive an error message like this:
"Fatal error: Allowed memory size of xxxxxx bytes exhausted".
If we can choose a recommended value, then it is 128 MB for the memory limit. This value is completely sufficient for the operation of the WordPress core. The only reason why this memory is not enough is if one of the plugins needs more. There is no way to tell from the processes themselves the exact amount of memory to run particular plugins. To monitor this parameter, you can use Server IP & Memory Usage Display, which provides complete information.

This plugin adds a useful information bar to the admin panel that shows active plugins, how much memory they use, and what limit is set for use by the WP app:

This allows you to quickly and easily track what is happening with the RAM and the plugins you are using by stopping and starting them one after the other. This way you can see which of them is using how much memory. The plugin also provides additional information such as the active PHP version, the IP address of the server, etc.
Why Do You Need to Increase the WordPress Memory Limit?
The most important processes that require a lot of resources are the optimization processes in WordPress, especially when working with media files.
An example of this is the need to create different thumbnails from a standard photo (WooCommerce, for example, creates several sizes of a main photo so that they can be used in different panels and plugins). This process requires computing power as well as sufficient allocated memory to process a particular photo. It is very important to know that if we have specified a high value for the PHP memory limit, this means that for each process that is opened, the specified memory limit will be reserved. With a high value, the memory allocated for the hosting package can be exhausted very quickly.
Another case in which you might encounter this “memory size exhausted” message is the import of products into the WooCommerce store. This is because several simultaneous database queries are performed to automatically transfer a product and its details to the store. Therefore, when choosing a WordPress hosting plan, it is important to pay special attention to the allocated RAM for a particular plan, as this plays an important role in the performance of your WordPress application.
How to Increase WP Memory Limit
Now, we'll look at several methods you can use to quickly and easily change the memory to meet the needs of our website's plugins and scripts. Of course, you can always reach out to your host for assistance.
Method 1: Edit the wp-config.php File
This method works directly with the WordPress platform and its configuration files by adding a standard WP directive in wp-config.php. To edit the file, you can use the cPanel File Manager or another handy text editor. Select the installation directory and right-click on wp-config.php:

Select the Edit option to be able to edit the file:
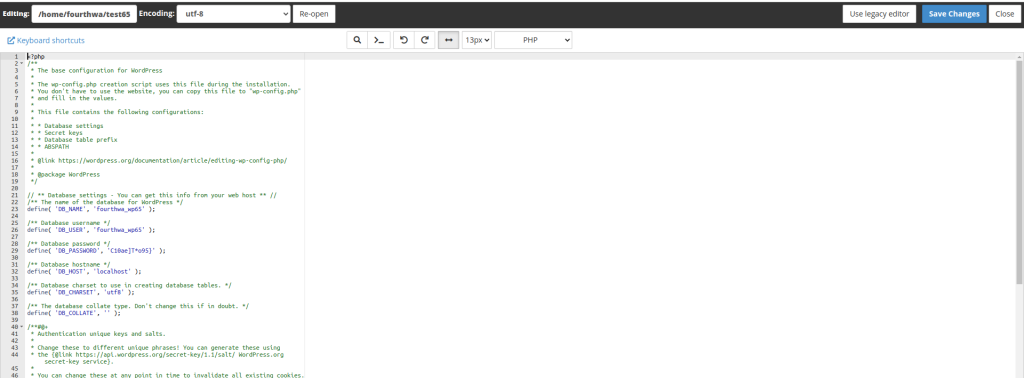
Find the line where the following is written:
/* Add any custom values between this line and the "stop editing" line. */
Immediately below it, add the directive to increase the memory limit, which has the following example form:
define('WP_MEMORY_LIMIT', '32M');
Replace the number with the value you require. Note that 128M of allocated memory is completely sufficient for the operation of most plug-ins. The value must not exceed the memory limit set for the hosting package.

To check whether the value has changed, we can use the Site Health Dashboard tool.

Select the Info tab and then open the WordPress constants window.


Here you can clearly see that WP_MEMORY_LIMIT is now 128M and has been changed. The other constant WP_MAX_MEMORY_LIMIT indicates the maximum value of the allocated memory (in this case, 256M) and corresponds to the PHP MEMORY LIMIT.
!IMPORTANT: If you increase the PHP memory limit, this means something other than automatically increasing the allocated memory that WordPress uses. By default, it is 40M, and it is recommended to increase it to the limit.
The maximum limit for our shared hosting plans is 1024M.
Please note that before you make any changes to the file, you should save a backup of the current file so that you can restore it if necessary.
Method 2: Use the WordPress Command Line Interpreter (WP-CLI) to Increase the Limit
If you have SSH access to your hosting plan, you can change the memory limit using a command line command. After logging in, go to the domain directory and execute the following command in the command line:
wp-config set WP_MEMORY_LIMIT 256M
It adds the directive we discussed in method 1 to the wp-config.php file. You can change the value, but it must not exceed the maximum value for the hosting package.
After you run the command, you will get the following message:
Success: Updated the constant 'WP_MEMORY_LIMIT' in the 'wp-config.php' file with the value '256M'.
Method 3: By Changing via the PHP Selector Field in the cPanel
This method is directly related to the first two, as it sets the global memory limit. We will show you how to change this parameter via your cPanel.
Select the Select PHP Version field in the Software section and open it:

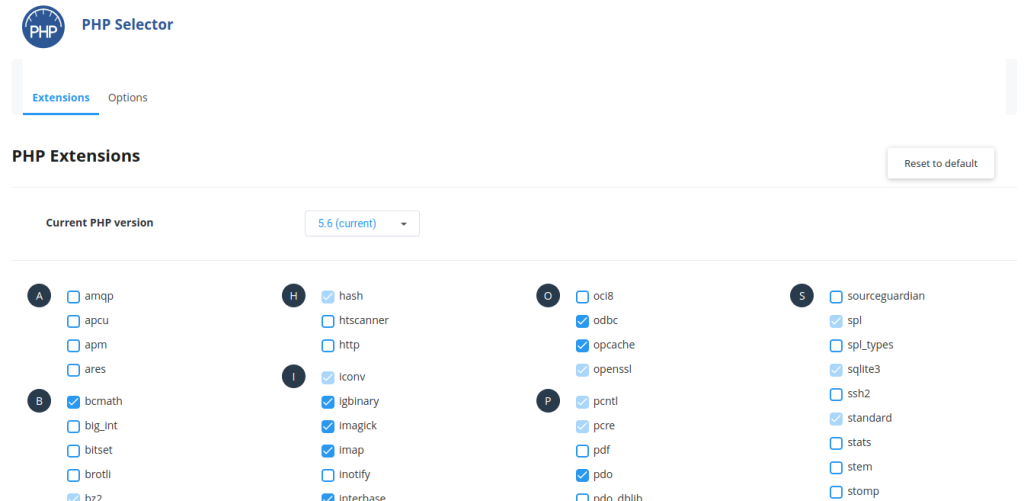
Select the Options tab and select the PHP version for which you want to change the limit from the drop-down box:

Search for the variable memory_limit in the table and set the desired value:

The new value is set. Note that this is the memory allocated for opening a single PHP process, and we recommend that the value is less than 1024M. The new value is set.
Method 4: Via a Directive in the .htaccess File
This WordPress file is extremely important for the configuration of the web server. Using it and the directives it contains, we can manage the web server directly without having to change its configuration files. We can also use it to control the PHP parameters. Here we look at how we can use it to change the memory_limit directive.
Each website can have its own .htaccess file, which is located in the domain's working folder. The file name starts with a dot because it is a system file that is usually hidden from users (by default, these files are not visible in the FileManager). To make them visible, open File Manager in the cPanel and select Settings.
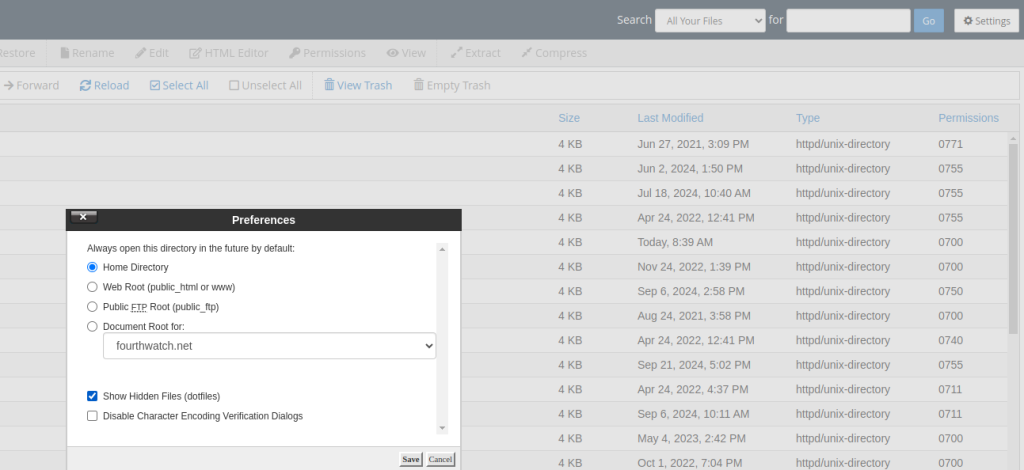
Activate Show Hidden Files (Folders). This allows you to display all system files and folders that begin with a dot.
Select the .htaccess file in the working directory of the domain and right-click on it, then use the Edit option:

If there is no .htaccess in the working directory of the domain, create it. After you have opened the edit mode, add the following line at the end of the file:
php_value memory_limit 256M
You can change the value as you wish so that the file should look something like this:
!Important information: The .htaccess file works recursively, i.e., if there is no such file in the working directory of the domain, the directives are taken from the top-level directory. Here is an example of the structure:
Our domain has a complete working directory path /home/cpaneluser/public_html/
No .htaccess file is created in this directory, but there is one in the main hosting directory /home/cpaneluser/. In this case, all rules written in /home/cpaneluser/ .htaccess are also valid for /home/cpaneluser/public_html/, since public_html is a subdirectory of /home/cpaneluser/ and inherits the policies from the file, including memory_limit if set. If we create the file /home/cpaneluser/public_html/.htaccess, the valid directives must be changed in it. and they are only relevant to the domain name. The other subdirectories take the directives from the .htaccess in the main hosting directory /home/cpaneluser/
Method 5: Use a Plugin
There are many WordPress plugins that you can use to increase the memory limit of your website. In this method, we will look at one such plugin—WP Tools—and some quick steps to change the memory limit.
Of course, we need to install and activate the plugin:

Once activated, it is available in the Site Management Admin Panel under the WP Tools tab:

To edit the memory, you must select the Settings field:
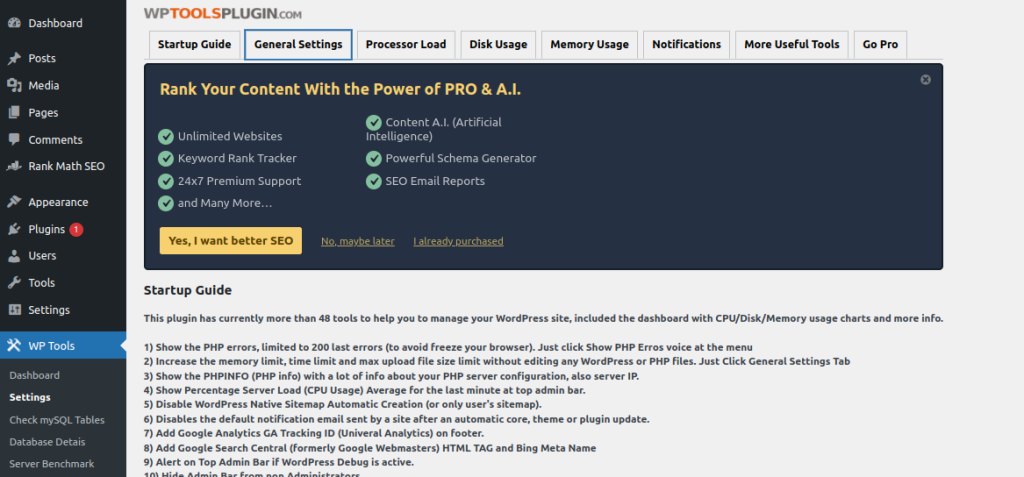
Select the General Settings tab and look for the option to change the memory limit. In the dropdown menu, you have the option to increase the WordPress memory limit to the maximum set via the PHP limit:

Note that the memory is 40M by default if it is not increased as described in method 1, which will constantly cause problems with the plugins. After you have changed the value, click on the Save Changes button.

After the change, we can already see that the value has become 128M:

Of course, the WordPress platform also offers many other plugins that allow you to configure memory limits quickly and easily.
Having Memory Limit Issues With Your WordPress Site? Hosting Jump Can Help
As your WordPress hosting provider, we make sure you get a plan that fits your WordPress application perfectly.
If your site is a simple blog or an informative website, we have prepared Blogger plans for you that are calculated to cover all technical features. The CPU and memory of the hosting plan are mostly optimized, with each plan building on the previous one with additional system performance.
Of course, online stores that use WooCommerce and an additional solid number of plugins also require higher system resources. Our online plans are tailored to the needs of your store and optimized to use significantly more resources compared to standard hosting plans, especially in terms of system memory. Each subsequent plan builds on the previous one, especially in terms of memory parameters, and offers good performance for stores with at least 10 active plugins + WooCommerce.
In order to fully analyze the needs of your application, our team of professionals also offers WordPress support plans that include many additional activities that we offer to solve your case. The main activities of our maintenance plans include keeping the websites as up-to-date as possible, creating a comprehensive website audit that examines every request and process generated by your application, system monitoring, application optimization, etc. All these elements are aimed at improving the performance of your application.
Determine the Optimal Memory Limit for Your Website
Unfortunately, there is no way to answer this question unequivocally, as each WordPress site is specific to itself, and much depends on whether it is an informational website or an online store and what exactly its application is. The hosting plan you choose, as well as the traffic on the website, crawling by bots, and links to external platforms, all have a significant impact. Each of these elements can consume a maximum amount of allocated disk space at peak times.
However, if we can set an average value, the memory limit of 256 million should be sufficient for your WordPress site with a simple theme and an example number of 15 plugins.
For online stores using WooCommerce and, accordingly, a number of analytics plugins (SEO, Google Analytics, etc.), a memory limit of 512M, or maybe more, is recommended. However, it is not recommended that the limit exceeds 1024M, as each open WordPress process will reserve 1024M, and this will cause the hosting plan limit to be reached very quickly.
Conclusion
Increasing the memory limit for WordPress websites is one of the surefire ways to optimize the application's performance. We have shown you several quick and easy methods to change this parameter. It’s always a good idea to prioritize larger memory allocation. This way, you’ll be able to avoid an unpleasant WordPress error occurring at a critical time. Of course, you can always count on our 24/7 technical support to make your app attractive to users.
If you'd like to learn more about the common WordPress critical error and how to fix it, check out our detailed guide.
*Materials from the Internet and the WordPress community are used.

