Setting up a new FTP account for WordPress is an important skill for any website owner who wants to manage their website's files more efficiently.
In this post, we'll walk you through how to set up and use FTP to manage your WordPress website. After reading this article, you will have enough knowledge about FTP, including how to use this technology to manage your website.
What Is FTP?
FTP (File Transfer Protocol) is a standard network protocol used for transferring files between a client and a server. It allows direct access to your website's files for better website management and troubleshooting.
FTP is particularly useful for some tasks, such as uploading large file packages, editing code directly, and managing the file structure of your website.
It's important to know that FTP also supports secure file transfer protocols (such as FTPS and SFTP), which are crucial for protecting data during transfer, especially when it comes to sensitive WordPress files.
How to Set up an FTP Account for Your WordPress Site
If you're a WordPress user, setting up an FTP account for your site is a handy skill for managing files and fixing issues. Here’s what you need to do—step by step:
1. Backup Files
Before you make any changes via FTP, you should make a backup copy of your WordPress website. This will ensure that you have a restore point in case something goes wrong.
To make things easier, you can use a plugin, some of which we recommend:
As part of the best WordPress plugins ever, these allow you to create full backups of your site files and folders. Now you can proceed with setting up and using FTP.
2. Extract FTP Account Credentials
To access your server via an FTP client, you will need the following information:
- Username
- Password
- Port number
- Host (FTP server address)
All login credentials for all features, including your FTP account information, can be found in the original email you received when you set up your HostingJump account.
If you have difficulty finding this email, please contact our team for assistance.
3. Install an FTP Client
To use FTP for WordPress, you need an FTP program. Popular FTP clients are:
For this tutorial, we will use FileZilla because it offers a straightforward interface for uploading files to WordPress and is free. Learn how to install FileZilla here:
1. Visit the FileZilla website, https://filezilla-project.org/ and download the appropriate client for your operating system.
2. Follow the installation instructions.
3. Once the installation is complete, open FileZilla to configure your FTP connection with the details described in point 3.
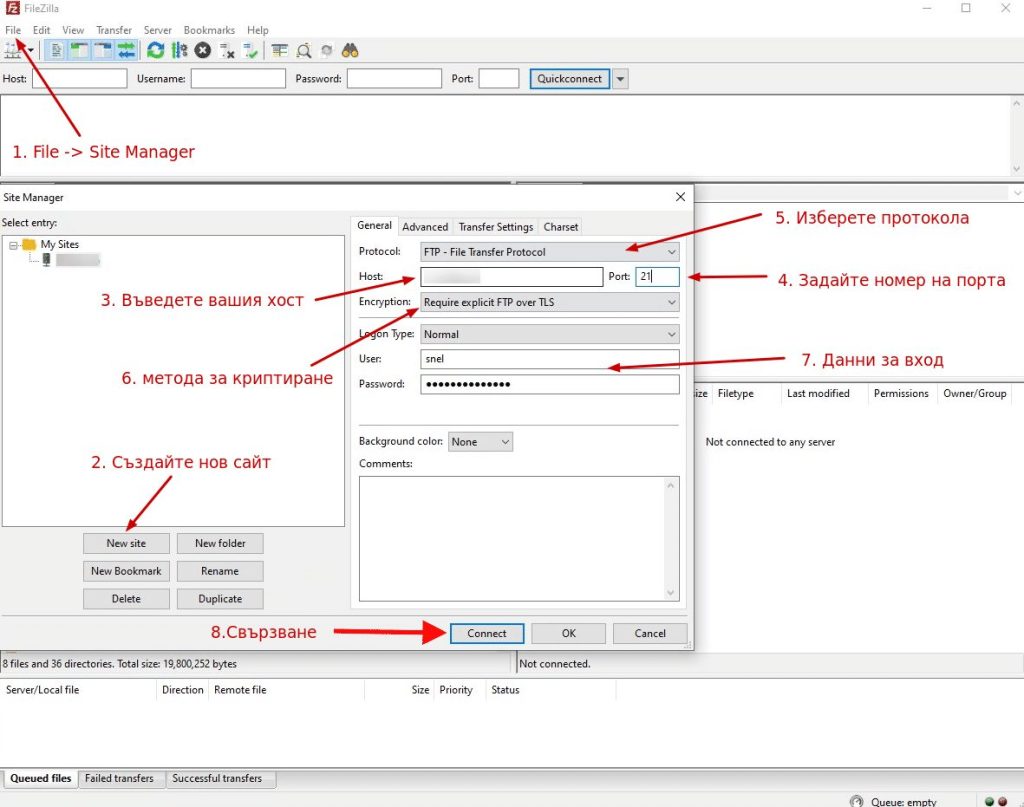
4. Connect FTP to the WordPress Site
Now let's connect FileZilla to your WordPress site:
- Open FileZilla and go to the Site Manager (File > Site Manager).
- Create a new site by clicking on “New Site” and entering the name of your site.
- Enter your host: There are three options:
- ftp.yourdomain.com
- The IP address of the server
- The hostname of the server (for example, "jump16.jump.bg").
- Specify the port number:
- 21 for FTP
- 22 for SFTP.
- Select the protocol:
- FTP (file transfer protocol).
or
- SFTP (SSH file transfer protocol).
- Select the encryption method (use FTP over TLS if available).
- Enter your login details (username and password).
- Click Connect to establish a connection.
You should see your server files on the right and your local files on the left.
That's it. Now you can download, modify, and upload files to your WordPress website using the FTP file protocol.
How to Manage WordPress Files Through FTP
Managing WordPress files via FTP is essential for maintaining and customizing your website. Whether you want to update themes, fix errors or create a backup of your website, you can use FTP to access your WordPress files directly.
Understanding the file structure
The file structure in WordPress is essential for the efficient management of your website. The most important directories include:
- - /wp-admin/ : Contains WordPress admin files.
- - /wp-content/ : Contains themes, plugins and uploads.
- - /wp-includes/ : Contains the core files of WordPress.
- - /public_html : Contains the files for your main site
Familiarize yourself with these directories to navigate efficiently and manage your files.
Drag-and-drop files between local and remote sites
You can easily transfer files to your WordPress site by using an FTP client. Simply connect to your server with the correct FTP access, navigate to the appropriate folders, and drag and drop the files from your computer to your WordPress directories.
To efficiently manage WordPress files via FTP, follow these steps to take advantage of the easy drag-and-drop functionality between your local computer and the remote server:
1. Connect to your server:
Use an FTP client such as FileZilla to connect to your WordPress server. Enter your FTP credentials (username, password, host, and port) to establish a connection.
2. Navigate to the desired directory:
Locate the directory with the files you want to transfer. On the local side, navigate to the folder on your computer. On the remote side, navigate to the WordPress installation directory.
3. Select the files you want to transfer:
In the FTP client, select the files you want to transfer by clicking and dragging to highlight them. You can select multiple files or entire directories.
4. Drag and drop
Once the files are selected, drag them from the local area to the remote area (or vice versa) in the FTP client user interface. Release the mouse button to start the transfer.
5. Monitoring the progress of the transfer:
The FTP client displays the progress of the file transfer. Depending on the size of the files and the speed of your Internet connection, the transfer may take more or less time.
6. Check the transfer:
Once the transfer is complete, check that the files have been successfully copied to the desired directory on the server. Also check that the files are full-size.
Locating themes and plugins in the /public folder
Themes and plugins are stored in the /wp-content/ folder:
- /wp-content/themes/ : Contains your WordPress themes.
- /wp-content/plugins/ : Contains your WordPress plugins.
Navigate to these directories to upload new themes or plugins or to change existing ones.
Would you like to upgrade the look of your website? Check out our list of the best free SEO-friendly themes for WordPress.
Deleting files and changing permissions
You can delete files by right-clicking on them and selecting 'Delete'. Be careful when deleting files so that you do not impair the functionality of your website. Changing file permissions is also easy with FileZilla:
1. Right-click on the file or folder.
2. Select 'File permissions…'.
3. Adjust the permissions as required (e.g., 755 for directories, 644 for files).
Security considerations when using FTP
When working with FTP, security is paramount. Here are some important security practices to keep in mind:
1. Use strong passwords
2. Enable secure FTP (SFTP or FTPS)
If possible, always use SFTP (SSH File Transfer Protocol) or FTPS (FTP Secure) instead of a standard FTP protocol. These protocols encrypt your data during transfer and thus protect it from eavesdropping and attacks.
Need Assistance with WordPress Settings? HostingJump’s WP Experts Can Help
If you have problems making the desired settings on your WordPress site, trust us! Our team of experts is available 24/7 to answer any questions or critical issues immediately!
Conclusion
Setting up an FTP account for a WordPress website provides direct access to the website's files, control and flexibility. Whether you want to fix bugs, upload large files like themes or plugins, or simply take a look at the backend of your site, FTP is an essential tool for any WordPress owner.
Use FTP today to extend the efficiency and control of your WordPress website.
FAQ
Can I use FTP to access files from my WordPress dashboard?
No, you cannot directly access files from your WordPress dashboard using FTP. The dashboard allows you to manage your site content and settings, but to upload or download files, you need to use an FTP client to connect to your site.
How can I download files from my WordPress site using FTP?
To download files from your WordPress site using FTP, connect to your server with your FTP client, navigate to the files you wish to download in the remote site section, and then drag them to your local site section to save them on your computer.
Can I upload files to WordPress without using FTP?
Yes, you can upload files directly through the WordPress dashboard. Simply navigate to the Media section, click on 'Add New', and you can upload files from your computer without needing FTP access.
What is the difference between FTP and FTPS?
The main difference between FTP and FTPS is that FTPS adds a layer of security by using SSL/TLS to encrypt the data being transferred, while FTP does not provide this encryption. If you are concerned about security, consider using FTPS for your WordPress site.
What FTP software is recommended for connecting to my WordPress site?
Some of the best FTP clients for connecting to your WordPress site include FileZilla, Cyberduck, and WinSCP. These programs provide a user-friendly interface to easily transfer files to and from your server.
Are there alternatives to FTP for uploading files to my WordPress site?
Yes, there are alternatives to FTP for uploading files to your WordPress site, such as using the WordPress dashboard, file managers provided by your hosting provider, or cloud storage solutions that can integrate with WordPress.