Nowadays, it is unthinkable that your website does not have a Secure Socket Layer (SSL) because it offers many advantages, the most important of which is security. Here are some of the most important conveniences of having an SSL certificate on your WordPress site:
- A secure connection between the browser and the server that processes the request to the website.
- Search engine optimization (SEO) benefits: Search engines favor websites that use https.
- If you process personal data or payments, you are required by GDPR to have such a certificate.
To take advantage of the SSL certificate, you need to activate it on your WordPress site. In this article, we will give you a short step-by-step guide on how to activate SSL in WordPress quickly and easily.
Obtaining an SSL Certificate
Before we continue with the actual configuration, you need to get SSL. You can basically achieve this in the following two ways:
Free - Many WordPress hosting providers, including us, provide free SSL certificates from Let's Encrypt. At Hosting Jump, a free SSL certificate is included with all shared hosting plans and managed services, making it easy to secure your WordPress site. From the customer's point of view, no further action is required. As soon as the domain name itself correctly points to your hosting account, the system automatically issues an SSL certificate and then renews it.
Paid - You can also purchase third-party certificates from authoritative web hosts. The advantage of this is that it is usually valid for a period of one year. There are also special certifications (EV) that are required by organizations. There is no free equivalent for these special certificates.
At Hosting Jump, we offer Sectigo SSLs, as they have proven to be a reliable SSL provider over the years.
How to Enable SSL for Your WordPress Site
A common myth about WordPress is that it's not secure because it's open-source. But that's not the case at all, and you don't have to be an expert to keep your site safe.
Once you have obtained an SSL certificate via one of the options listed, you can proceed with the actual activation of SSL in WordPress. Here are the steps to follow to add SSL to your site:
- Enable https connection
Now that you have SSL, you can switch from the http to https protocol to secure users' connection to the website. There are two options for this action. You can install an SSL certificate via the WordPress admin panel or by using an additional plugin.
Manual SSL configuration
You can install SSL certificates manually through the WordPress admin dashboard:
Access the menu in the admin panel -> Settings -> General. Next, you need to change the values in the fields “WordPress Address (URL)” and "Site Address (URL)".
We also attached an image for better illustration:

As you can see in the picture, we have set the “protocol "https".
IMPORTANT!!! In some cases, this is not sufficient, and certain URLs will not load via the new https protocol, resulting in so-called mixed content. In this case, we recommend that you also add the following code to your website's .htaccess file:
RewriteEngine On
RewriteCond %{HTTPS} off [OR]
RewriteCond %{HTTP_HOST} ^www. [NC]
RewriteCond %{HTTP_HOST} ^(?:www.)?(.+)$ [NC]
RewriteRule ^ https://%1%{REQUEST_URI} [L,NE,R=301]
Use an SSL Plugin
In this material, we will discuss how to install the Really Simple SSL plugin and what the next steps are in SSL certificate installation.
Install and Activate SSL with the Really Simple SSL Plugin
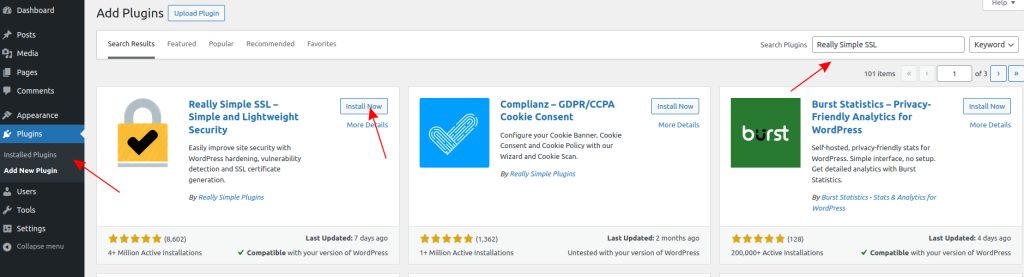
To do this, it must first be installed via the WordPress admin panel -> Plugins -> Add new plugin. Enter "Really Simple SSL" in the search field, install and activate the plugin:
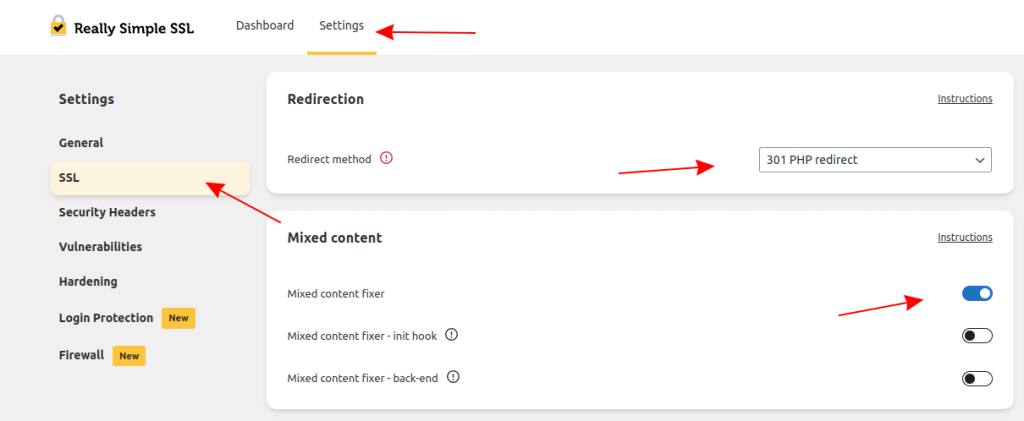
After activating the plugin, a popup appears with the initial settings. You only need to activate the SSL redirect (301) and the correction for mixed content. Everything else we have as options is not the subject of this thread. If you close the initial popup, you can access the plugin from the admin panel -> Settings -> SSL & Security. Then select the Settings -> SSL tab. The first two options need to be set, namely:
Redirect method -> 301 PHP Redirect
Mixed Content Fixer -> Active
If you need more help with installing WordPress plugins, check out our detailed tutorial.
How to Check SSL Activation
After you have performed the above actions, you can also perform an additional check to ensure that everything is working correctly. You can use the following options for this purpose:
- Via your browser
Open your WordPress site and first check whether it contains any errors. In the bar for writing the website's name (domain), there is a button in front of it. Once you have pressed it, you should see that your website is secure.
If your check shows "SSL certificate pending", wait until the deployment is complete to make sure everything is enabled and working successfully.
- Via external verification
You can use a website like https://www.sslshopper.com/ssl-checker.html for this purpose.
When checking, all fields must be marked in green, which means that everything is working correctly.
Need Help With SSLs? Hosting Jump Is at Your Service
Do you need to add an SSL certificate to your WordPress site? We at Hosting Jump provide a free SSL certificate from Let's Encrypt for each of our hosting accounts.
If you want to further update your WordPress website by enhancing security, we offer you a choice from different plans to buy SSL certificates.
Conclusion
By opting for SSL installation, you ensure an encrypted connection between the hosting where the website is located and the visitor's browser, providing a higher level of security for your data. Installing the certificate aids in protecting all credit card numbers and personal data. It is particularly important that websites and online stores that work with this type of data guarantee their users' security and peace of mind when choosing their website.
In conclusion, we can say that configuring the secure version of http (https) using SSL is a mandatory step for every single website today and should not be neglected under any circumstances.