The loading speed of a webpage is one of the most important aspects when creating a website. This should never be neglected, as it will directly impact the traffic to it. More and more search engines are taking this into account, and it plays a crucial role in the ranking of a website.
One of the most important tricks to improve the speed of a website is to cache and optimize loading resources (CSS, JS, images, and others).
For this reason, in this material, we will examine and compare two of the most popular WordPress caching plugins – Autoptimize and Litespeed Cache.
We will make a direct comparison of what the two caching plugins offer, what you can do with them, and our direct tests. With this information, you will be able to make an informed decision about which plugin you want to use for your website.
IMPORTANT!!! Note that you should NEVER use two plugins for the same thing. This is especially true for cache, as this is more likely to cause difficulties.
Autoptimize and LiteSpeed Cache: An Overview
Before we move on to configuration and testing, it is necessary to briefly introduce the two plugins.
Overview of Autoptimize
Autoptimize is a plugin that primarily aims to optimize CSS and JS files using various tricks. The paid version of the plugin adds options such as page cache, image optimization, and additional optimization for CSS, JS, and HTML files.
The main goal is to achieve a better loading time for the website. At the time of this writing, the plugin has over 1 million installations and is regularly supported by updates.
For more tips and tricks, check out our guide on optimizing your WP site speed.
Overview of LiteSpeed Cache
LiteSpeed Cache is a plugin that was specially developed for the Litespeed web server but also works perfectly with other web servers (Apache, nginx, etc.). (Apache, nginx, etc.).
There is no paid version, i.e., all the extras are available for free, which makes it extremely attractive for every user.
Each user of LiteSpeed Cache can configure a variety of options: CSS/JS/HTML Minify, Combine, Image Optimization, Object cache, and much more.
If you want to take full advantage of the Litespeed Cache plugin, you should use the Litespeed web server.
At Hosting Jump, we use it for shared hosting, WordPress hosting, and eShop hosting plans, and it can also be applied to virtual servers and managed VPS.
Autoptimize vs LiteSpeed Cache: A Comprehensive Comparison
Now that we've given an overview of the two caching plugins, let's dive deeper and do a more comprehensive comparison, taking into account their features, compatibility, user interface, and price:
Features
- Autoptimize focuses on the optimization of resources such as CSS, JS, and HTML.
- Litespeed Cache offers a wide range of tools that cover almost all needs in the overall optimization of a website.
Server Integration
- Autoptimize can be used on any web server.
- Litespeed Cache is recommended for use with Litespeed Webserver.
User Interface
- Autoptimize offers a clean, minimalist design that may even be perceived as outdated.
- Litespeed Cache, on the other hand, uses a modern design, but the many options offered may scare or confuse inexperienced people.
Pricing
- Autoptimize has a Pro version that offers many more functions of the plugin.
- The Litespeed Cache plugin is completely free and does not require a license.
LiteSpeed Cache vs Autoptimize: Speed and Performance Tests
Here are the conditions under which we will carry out the comparison: technical characteristics:
- WordPress version: 6.5.5 (current at the time of writing)
- Plugins: Apart from the plugins we include in this material, others are not installed.
- Web server: Litespeed Web server (paid license)
- Database version: MariaDB 10.6.18
- PHP version: 8.1
Note: We intentionally do not disclose which template is used. To better show the results of the plugins, we have placed a whole series of demo content on the homepage. This is not common practice for most users, and we want to leave no doubt that the PageSpeed results are caused by the theme used.
We provide you with a screenshot of a test that was performed with https://pagespeed.web.dev/ without any plugins. This defines the baseline of the test:
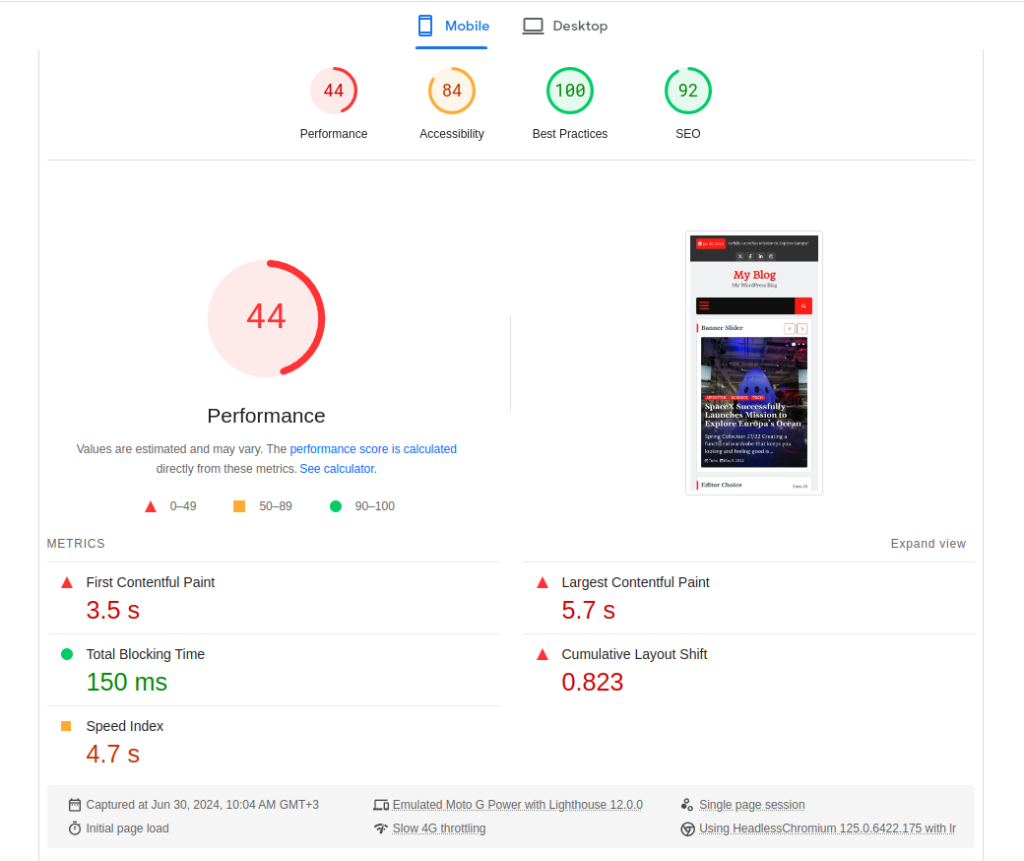
For this test, we will only use the mobile version. The numbers are not important in this case, but their subsequent change is.
Results of the activation of Autoptimize
Next, activate Autoptimize. For the first test, we will not change any settings but rather leave them as default. We share the results:
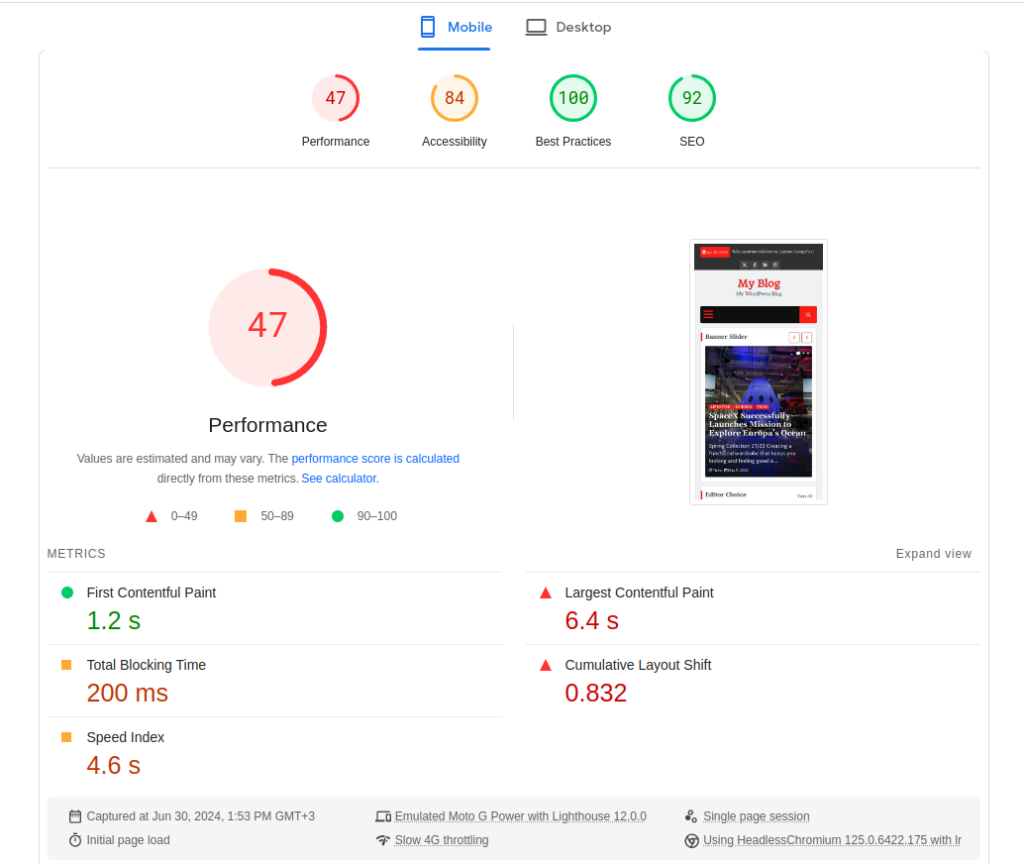
We can see that the improvement is minimal.
Note: Results may vary depending on the theme and plugins used.
This can be considered normal, and for this reason, let us move on to enabling additional options:
In WordPress administration -> Settings -> Autoptimize:
- From the JS, CSS, and HTML tab, we activate:
Aggregate CSS files; also aggregate inline CSS, Generate data: URIs for images, eliminate render-blocking CSS, and inline all CSS. Also minify inline JS/CSS:
- From the Images tab:
Image optimization & CDN, lazy-load images:
- From the Extra tab:
Remove emojis, remove query strings from static resources, and remove WordPress block CSS
We clear the cache to regenerate all CSS/JS/HTML files and check the page again with the PageSpeed test. Here is the result:
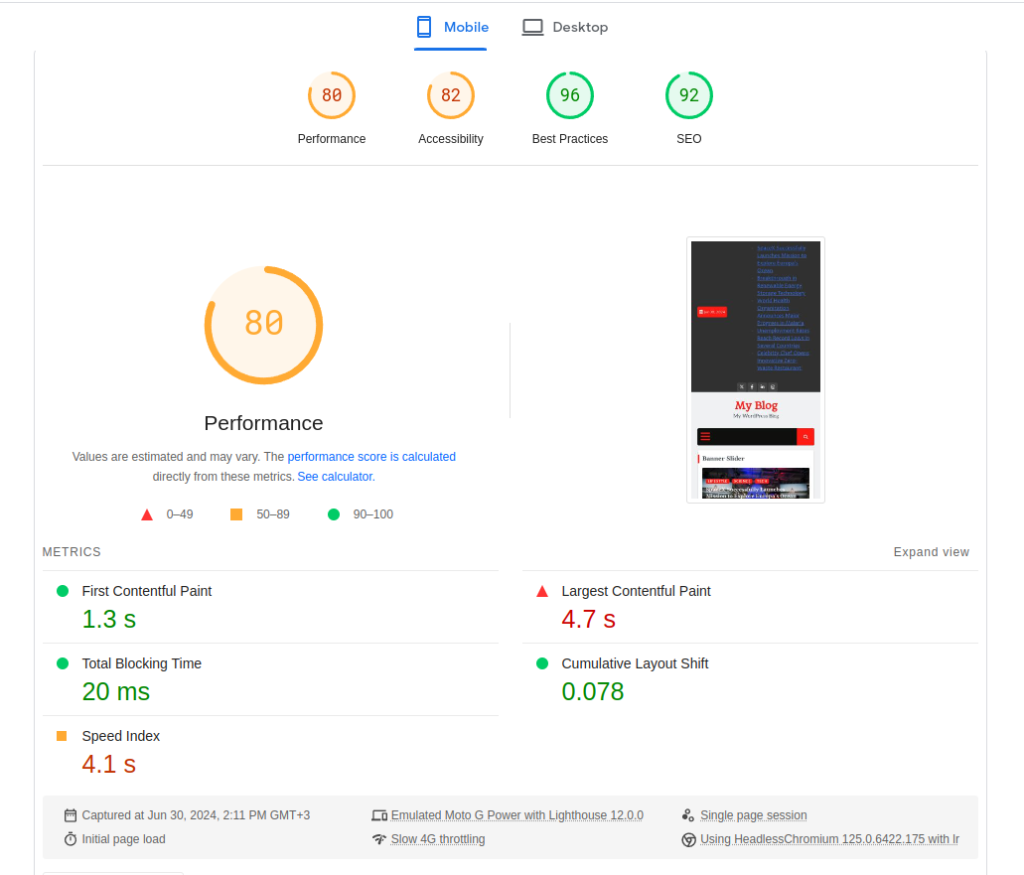
As you can see, the results are much better. We see a doubling of the performance result with just a few mouse clicks.
Results of the activation of LiteSpeed Cache
Let us also continue with the Litespeed Cache plugin.
The initial procedure is the same. Again we ran a repeated baseline test. The goal was to see if there was a cached result, but the result was identical to the one above.
We then installed the Litespeed Cache plugin, and again we did not change any settings but used the default settings. Here is the result:
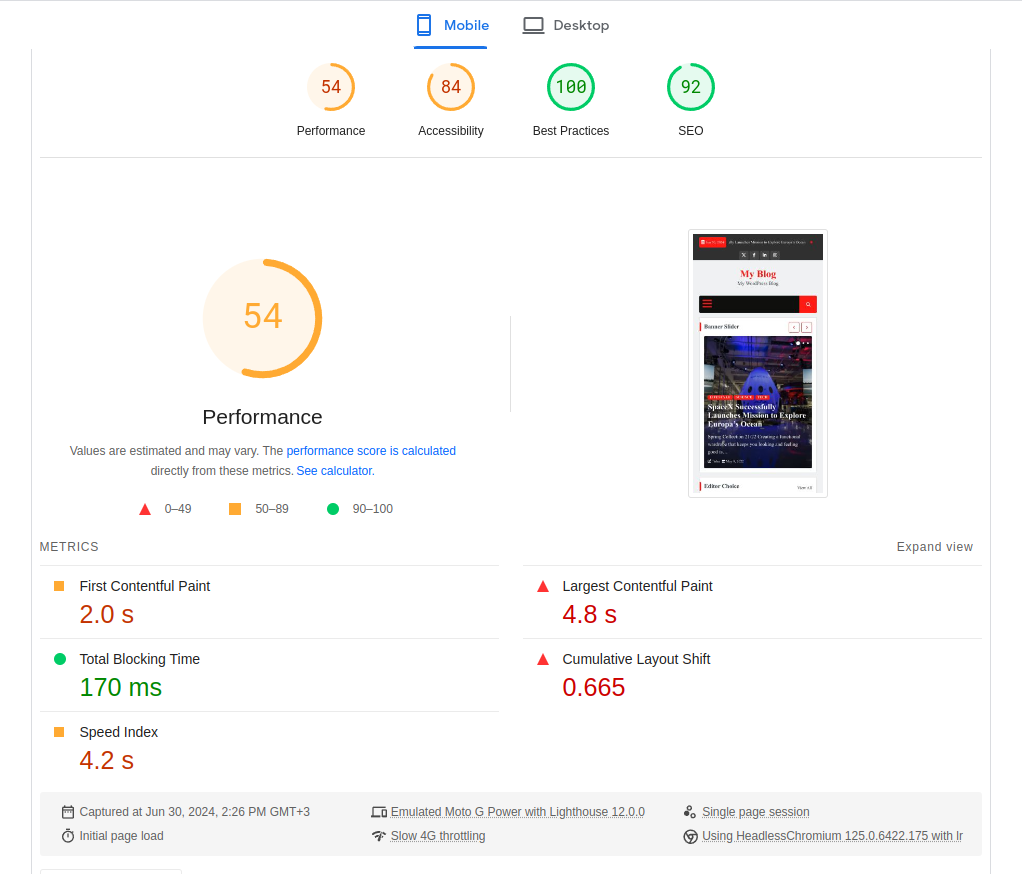
As you can see, the first results are better. The performance has increased by 10 points without doing anything other than installing and activating the plugin.
Now activate some additional settings in the WordPress admin panel -> Litespeed Cache
- In the “General” section, we activate the "Domain key". We also fill in the "Server IP" field here.
- In the "Cache" section, "Object" tab, we activate the object cache and enter the required fields for our Redis instance. On the "Browser" tab, we activate the browser cache.
- In the "Image optimization" section, we send a request to optimize our images. This will create webp versions.
- In the Page Optimization section, CSS settings tab, we activate: CSS Minify, CSS Combine, Generate UCSS, and Load CSS asynchronously. In the "JS settings" tab JS Minify and JS Combine.
- In the “HTML” section: HTML Minify, DNS Prefetch, DNS Prefetch Control, Remove Query Strings, Load Google Fonts Asynchronously, Remove WordPress Emoji, and Remove Noscript Tags. On the Media Settings tab, Lazy Load Images and Add Missing Sizes.
Let us do another test after these changes. Here is the result:
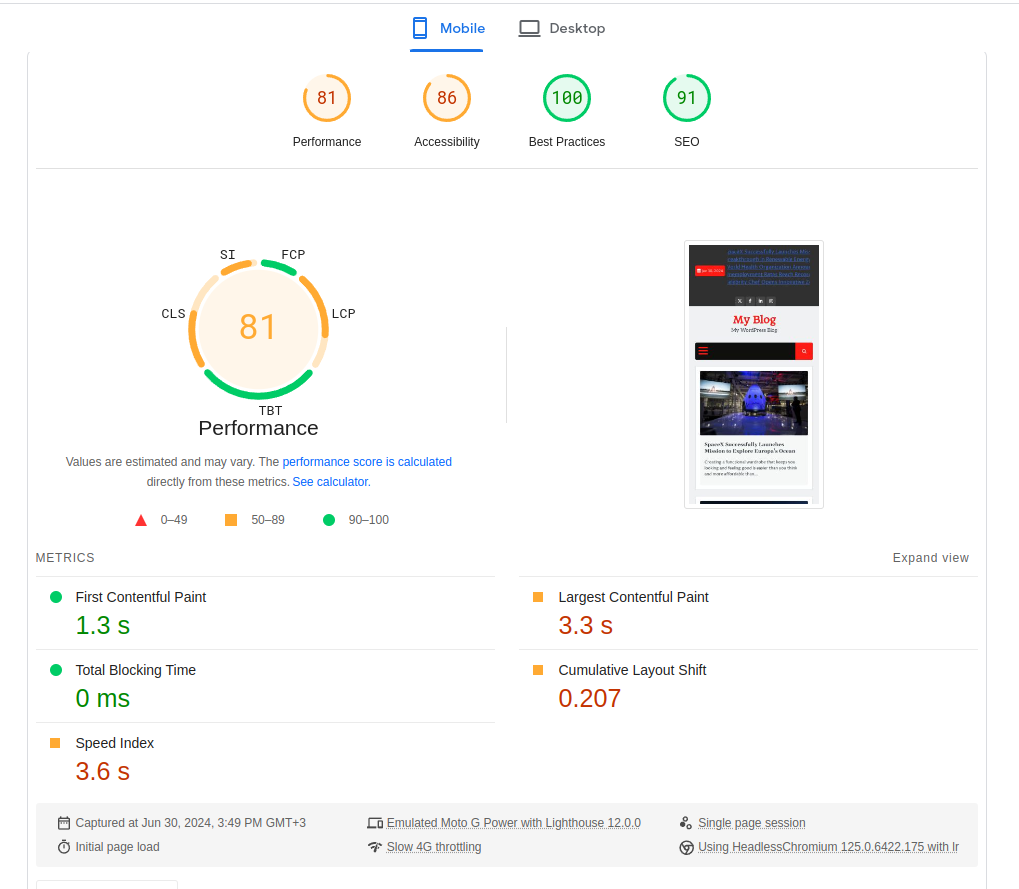
We can already see a clear improvement in the parameters. The score itself is similar to that of Autoptimize, but if we look closely, we get much better values for the Speed Index and Largest Contentful Paint.
Separately, we now see an improvement in Accessibility that you should not miss either. If we do a little more fine-tuning by enabling Guest mode, we can get even better results:
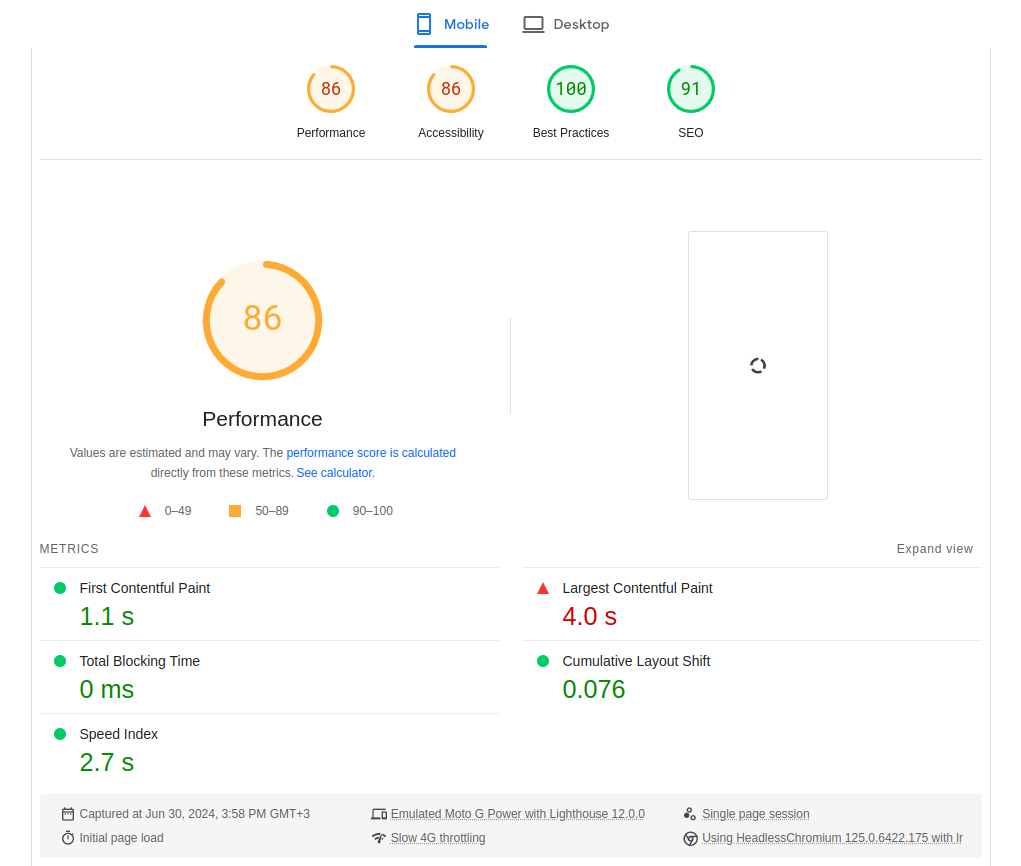
This is the strength of the Litespeed Cache plugin - you have the options you need to fine-tune it. We recommend that you also take a look at our detailed explanation of the plugin, which you can find via the link below:
Conclusion
In conclusion, we can tell you that when hosting with Litespeed Web Server, it is always recommended to use the LiteSpeed Cache plugin for WordPress.
Do not forget that in addition to better page rating results, you also get page cache, something that some similar plugins lack or include in their paid versions.

